How to Add Users to a Docker Container
- Create an Express Application
- Create a Docker Image of the Application
- Build an Image
- Run a Container
- Verify That the User Was Created
- Fetch Data From the Container
- Conclusion
When developing applications, we usually have different users interacting with a system to execute different functionalities. These users have authorities that enable them to execute the functionalities based on their roles.
Note that there are super users who can execute all the functionalities in the system as they have been assigned all the roles of the system. Similarly, we can create users for Docker containers and set permissions for the users to ensure that they can only execute specific tasks in the container.
These enhance the security of the container as we can limit access to the critical part of the container to super users and also track which user was interacting with the system when a particular event occurred.
In this tutorial, we will learn how to add users to a Docker container by implementing an Express application that returns an array of products.
Create an Express Application
Open WebStorm IDEA and select File > New > Project. Select Node.js and change the project name on the Location section from untitled to product-api.
You should have installed the node runtime environment so that the Node interpreter and Package manager sections can be added automatically from the computer. Press the button labeled Create to generate the project.
To install Express, open a new terminal window using the keyboard shortcut Alt+F12 on WebStorm and use the following npm command to install the dependency.
~/WebstormProjects/product-api$ npm install express
Create a file named index.js in the current folder and copy and paste the following code into the file.
const express = require('express')
const app = express()
const port = 3000

app.get('/', (req, res) => {
    res.json(
        [
            {
                name: 'Iphone 13 Pro',
                price: 1500.67
            },
            {
                name: 'Samsung Galaxy A53',
                price: 1300.56
            },
        ])
})

app.listen(port, () => {
    console.log(`Example app listening on port ${port}`)
})
In this file, we have created an Express application that returns an array of products when we make a GET request to / on our browser. Note that this application exposes port 3000, which helps us to serve this application.
Create a Docker Image of the Application
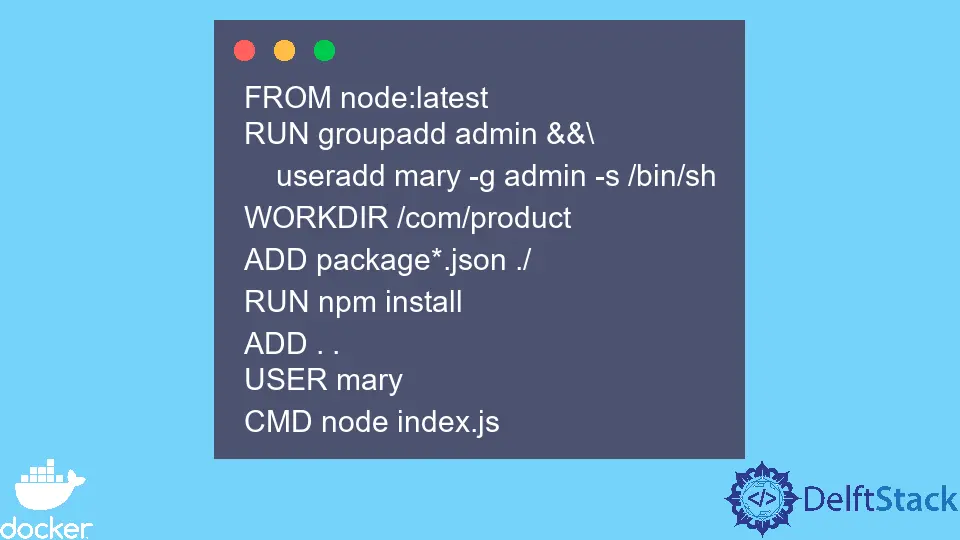
Create a file named Dockerfile in the product-api folder and copy and paste the following code into the file.
FROM node:latest
RUN groupadd admin &&\
    useradd mary -g admin -s /bin/sh
WORKDIR /com/product
ADD package*.json ./
RUN npm install
ADD . .
USER mary
CMD node index.js
In this file, we have created an image of our application using node:latest as the base image. The RUN instruction following the FROM instruction creates a group named admin and adds a user named mary to the group.
We have used the backslash \ to continue the command to the next line. Note that the commands used to create a group and a user are Linux commands, and they include groupadd and useradd.
The other important instruction in this file is the USER instruction that sets the default user that will be used for the remaining stage.
We can also set the default group though this is optional. The Docker documentation provides the usage of the remaining instructions in detail.
Build an Image
To build an image, open a new terminal window using the keyboard shortcut Alt+F12 and use the following command to create an image named product-api.
~/WebstormProjects/product-api$ docker build --tag product-api:latest .
This command executes the file named Dockerfile from the first file sequentially, as shown in the terminal window below. The dot . at the end of the command shows the location of the Dockerfile file, which is in the current folder in this case.
 => [1/6] FROM docker.io/library/node:latest@sha256:bb3b9f1867edba6d8892758889e43b2f0205ebbd381969a2c45577d38281  95.4s
 => => resolve docker.io/library/node:latest@sha256:bb3b9f1867edba6d8892758889e43b2f0205ebbd381969a2c45577d38281a  0.1s
 => [2/6] RUN groupadd admin &&    useradd mary -g admin -s /bin/sh                                                6.3s
 => [3/6] WORKDIR /com/product                                                                                     0.9s
 => [4/6] ADD package*.json ./                                                                                     0.7s
 => [5/6] RUN npm install                                                                                          7.1s
 => [6/6] ADD . .
Run a Container
Once our image has been built, use the following command to run a container named product-service from this image.
~/WebstormProjects/product-api$ docker run --name product-service -d -p 3030:3000 product-api:latest
This command runs a container that maps port 3000 to port 3030 on the localhost since the container is being used locally.
Verify That the User Was Created
To verify that a user was created, use the following command that allows us to execute a command from a running container using the exec instruction.
~/WebstormProjects/product-api$ docker exec -it product-service /bin/sh
Since we specified the WORKDIR as /com/product, the command runs in this directory. The command runs in the default directory if we do not specify a directory.
This command executes an interactive Bash shell, and we can use the Bash session to execute commands on the running container. Execute the following command on the running container to verify the user group, as shown below.
$ id mary
Output:
uid=1001(mary) gid=1001(admin) groups=1001(admin)
We have seen that the container has a user named mary from the group named admin, allowing us to change permissions as required.
Fetch Data From the Container
Open any browser and issue a request to localhost:3030 (http://localhost:3030/) to verify that our application is working as expected. Ensure the request returns the product API we created in the index.js file, as shown below.
[
    {
    "name": "Iphone 13 Pro",
    "price": 1500.67
    },
    {
    "name": "Samsung Galaxy A53",
    "price": 1300.56
    }
]
Conclusion
In this tutorial, we have learned how to add a user to a container using Dockerfile. We have also seen how to add a user to a group as users belong to specific groups in an organization.
Note that there are different approaches to achieving the same result, so be free to use any method that meets the requirements.

David is a back end developer with a major in computer science. He loves to solve problems using technology, learning new things, and making new friends. David is currently a technical writer who enjoys making hard concepts easier for other developers to understand and his work has been published on multiple sites.
LinkedIn GitHub