How to Use ngIf Else on Angular
-
Use the
*ngIfas a Standalone Function in Angular -
Use the
*ngIfWithelse -
Use the
*ngIfWithelseandthenStatements in Angular
When we build web applications as developers, we need to set up the web app to adjust the pages on the fly; the *ngIf statement becomes handy. *ngIf is used to manipulate HTTP elements rendered on a page.
It works in a condition whereby we tell the web app to perform a certain function after some parameters have been put in place. And when such parameters are not in place, it should perform another kind instead.
We will perform some functions using only the *ngIf. Then we will combine the *ngIf with the else statement and see what is possible. Lastly, we will use the *ngIf else then combination to manipulate HTTP elements.
Use the *ngIf as a Standalone Function in Angular
So here, we will use the *ngIf statement alongside the true or false conditions.
We will do all the work in the app.component.html.
<h1>*ngIf in Angular</h1>
<h2 *ngIf="true">
  Hi, Youtube
</h2>
The webpage displays Hi, Youtube when the *ngIf condition is set to true. Once it is changed to false, Hi, Youtube disappears from the webpage.
We can also pass the function through the app.component.ts like this:
import { Component } from "@angular/core";

@Component({
  selector: "app-root",
  templateUrl: "./app.component.html",
  styleUrls: ["./app.component.css"]
})
export class AppComponent {
  title = "CodeSandbox";
  displayMe=true;
}
And we then change the *ngIf value to displayMe like below:
<h1>*ngIf in ANgular</h1>
<h2 *ngIf="displayMe">
  Hi, Youtube
</h2>
Just like the first example, the basic rules work the same.
Use the *ngIf With else
When the *ngIf condition is combined with the else statement, it helps us to decide what content we want to appear on the webpage at any point in time.
This method requires that we nest the other statement that we want to appear in Hi, Youtube inside the ng-template tag.
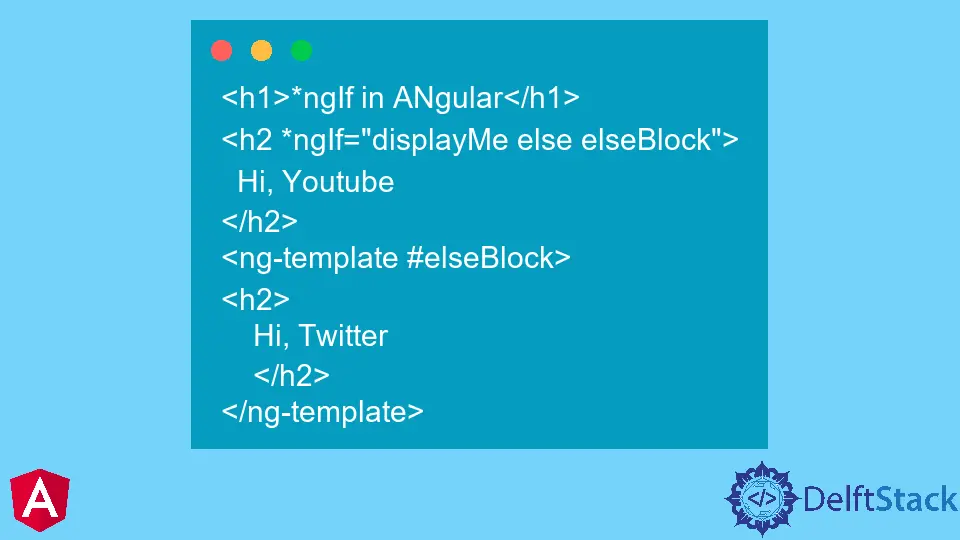
The app.component.html will then look like this:
<h1>*ngIf in ANgular</h1>
<h2 *ngIf="displayMe else elseBlock">
  Hi, Youtube
</h2>
<ng-template #elseBlock>
<h2>
    Hi, Twitter
    </h2>
</ng-template>
You will notice that we used the else statement alongside the *ngIf condition, which allows us to have better control over the content of the webpage.
So in the app.component.ts, when the displayMe has true value, Hi, Youtube will display. When it’s false, Hi, Twitter will display.
Use the *ngIf With else and then Statements in Angular
In the previous example, we were introduced to the ng-template, which works alongside the else statement. When used with *ngIf and else, the then statement allows manipulating contents within the ng-template.
It’s a welcome solution for a coder who wants to keep a structured and well-arranged code file.
Our app.component.html will be configured as such:
<h1>*ngIf in ANgular</h1>
<h2 *ngIf="displayMe; then ifBlock else elseBlock">
  Hi, Youtube
</h2>
<ng-template #ifBlock>
<h2>
    Hi, Google
    </h2>
</ng-template>
<ng-template #elseBlock>
<h2>
    Hi, Twitter
    </h2>
</ng-template>
So in the app.component.ts, when the displayMe has a true value, Hi, Google will show, and when it’s the false value, Hi, Twitter will show.

Fisayo is a tech expert and enthusiast who loves to solve problems, seek new challenges and aim to spread the knowledge of what she has learned across the globe.
LinkedIn