How to Bundle an Angular App for Production
- Use Angular CLI to Bundle an Angular App for Production
- Use Webpack to Bundle an Angular App for Production
- Use Gulp to Bundle an Angular App for Production
- Conclusion
This article will demonstrate different methods to build an Angular application for deployment after successfully creating the app.
Before we go ahead and build the app, it is ideal for running the app using ng serve --prod; we then proceed to this URL: http://localhost:4200/ to see the app run, and from here, we can observe the behavior of the application in action.
Now let us look at different methods to bundle an Angular application.
Use Angular CLI to Bundle an Angular App for Production
This method is the most widely accepted method to bundle an Angular application as it works across all versions of Angular. CLI gives the developer fewer headaches during the build process.
The CLI method is your best bet for a developer who wants to adapt the project to use the Ahead of Time Compilation.
First, CLI needs to be installed into our Angular application; we open our terminal, type in npm install -g @angular/cli, and press enter.
After that has been fully installed, we proceed to a new folder, and we create a new application by typing in ng new newApp. So we proceed to this folder to start building our app.
Once we develop our app, we bundle the app by typing in ng build.
It is usually ideal for compressing bundled apps, as this makes the app load faster and generally works efficiently.
We can compress using the Brotli compression. We open the terminal and type in: for i in dist/*/*; do brotli $i.
Then we are done bundling our Angular with Angular CLI.
Use Webpack to Bundle an Angular App for Production
The webpack method is often regarded as a powerful module bundler. It monitors the source codes of the built apps and seeks out the import statements.
It develops two dependency graphs and then releases two bundle files for the application. One is the app.js, which contains only the application code, and the other is called the vendor.js file, which contains all the vendor dependencies.
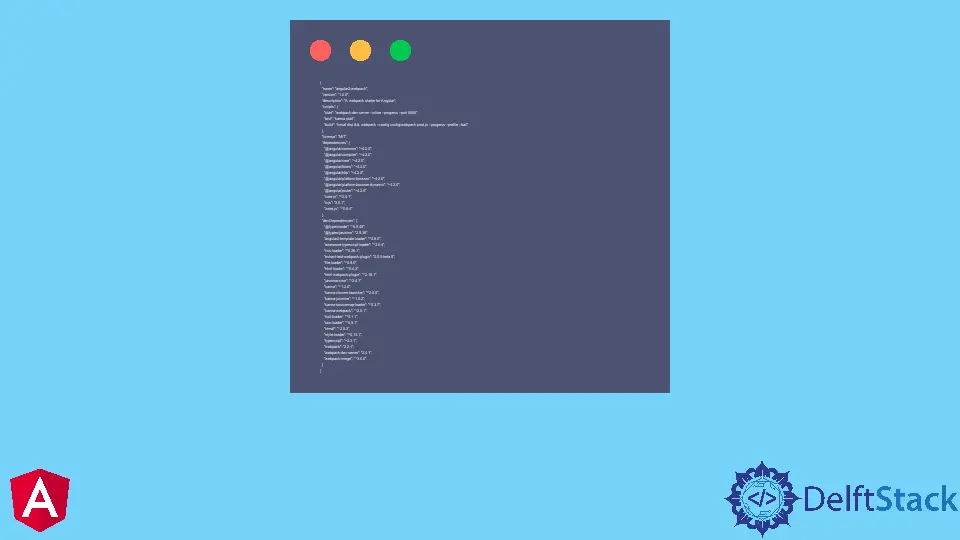
To install the webpack, we first create a new project folder, called angular-webpack, we cd into this file, create a file called package.json, and copy the following codes inside it.
Code Snippet (package.json):
{
  "name": "angular2-webpack",
  "version": "1.0.0",
  "description": "A webpack starter for Angular",
  "scripts": {
    "start": "webpack-dev-server --inline --progress --port 8080",
    "test": "karma start",
    "build": "rimraf dist && webpack --config config/webpack.prod.js --progress --profile --bail"
  },
  "license": "MIT",
  "dependencies": {
    "@angular/common": "~4.2.0",
    "@angular/compiler": "~4.2.0",
    "@angular/core": "~4.2.0",
    "@angular/forms": "~4.2.0",
    "@angular/http": "~4.2.0",
    "@angular/platform-browser": "~4.2.0",
    "@angular/platform-browser-dynamic": "~4.2.0",
    "@angular/router": "~4.2.0",
    "core-js": "^2.4.1",
    "rxjs": "5.0.1",
    "zone.js": "^0.8.4"
  },
  "devDependencies": {
    "@types/node": "^6.0.45",
    "@types/jasmine": "2.5.36",
    "angular2-template-loader": "^0.6.0",
    "awesome-typescript-loader": "^3.0.4",
    "css-loader": "^0.26.1",
    "extract-text-webpack-plugin": "2.0.0-beta.5",
    "file-loader": "^0.9.0",
    "html-loader": "^0.4.3",
    "html-webpack-plugin": "^2.16.1",
    "jasmine-core": "^2.4.1",
    "karma": "^1.2.0",
    "karma-chrome-launcher": "^2.0.0",
    "karma-jasmine": "^1.0.2",
    "karma-sourcemap-loader": "^0.3.7",
    "karma-webpack": "^2.0.1",
    "null-loader": "^0.1.1",
    "raw-loader": "^0.5.1",
    "rimraf": "^2.5.2",
    "style-loader": "^0.13.1",
    "typescript": "~2.3.1",
    "webpack": "2.2.1",
    "webpack-dev-server": "2.4.1",
    "webpack-merge": "^3.0.0"
  }
}
Next, we open a terminal and install these packages using npm install. We run the ng build command when the project is done.
Use Gulp to Bundle an Angular App for Production
Gulp is another powerful tool to bundle Angular applications on the Angular 2 framework as it is more efficient for building complex, larger projects. And also, there are portions of the gulp build process that can be automated, making the workflow less cumbersome.
First, we will create a new project; we go inside the folder and install gulp from the terminal, using $npm install gulp.
We create a gulpfile.js file in the project folder and copy all the HTML files from the app/views folder to the dist folder. Then we run $gulp copy-html-files from the terminal.
Developers don’t need to run all the tasks involved in gulp build; one needs to install $npm install gulp-run-sequence. It allows several tasks in the gulpfile.js to be run from the terminal.
We run the $gulp build when our project is fully ready.
In cases where we want to remove some contents from the dist folder, perhaps before versioning, or the developer wants to erase previous files and inject new files, all that needs to be done is type in: npm install gulp-clean in the terminal.
Considering that the required steps to build an Angular app with gulp are quite stretchy, we can automate this process. We install npm install gulp-watch; this will re-execute any commands defined in the run-sequence every time we change our files.
Conclusion
There are various ways to build an app on Angular optimally; the adopted method depends mainly on the kind of project we are trying to build, time, and experience.

Fisayo is a tech expert and enthusiast who loves to solve problems, seek new challenges and aim to spread the knowledge of what she has learned across the globe.
LinkedIn