让 React 组件/Div 可拖动
-
使用
onMouse使 React 组件/Div 可拖动 - 使用 React-Draggable 依赖项使 React 组件/Div 可拖动
- 使用漂亮的 DnD 使 React 组件/Div 可拖动
- 结论

现在成为网站建设者或者选择网站建设作为一种爱好很有趣。你可以简单地使用鼠标选择内容并排列它们来构建网站,就像拼图一样。
当我们创建使用户能够轻松拖放项目的内容或应用程序时,它使应用程序易于使用,即使对于新手也是如此,这可能会导致该应用程序在市场上得到广泛接受。
当我们在 React 中构建应用程序或游戏时,拖放内容的能力可以轻松快速地完成这些任务,即使是更复杂的任务。
让我们看一些示例,这些示例将帮助我们学习如何使组件可拖动。
使用 onMouse 使 React 组件/Div 可拖动
React 的可拖动特性利用了大量的事件侦听器,但本示例将利用三个:onMouseDown、onMouseMove 和 onMouseUp。
我们首先创建一个新的 React 项目。我们在 VS Code 中打开终端并输入 npx create-react-app dragone。
然后我们导航到 dragone 文件夹并创建两个文件夹。第一个文件夹将命名为 Main,在其中,我们将创建 MainApp.js 和 MainApp.css 文件。
这些文件将包含主页的代码。
第二个文件夹将命名为 Components,其中包含两个文件 Dialog.js 和 Dialog.css。这些将是我们想要在浏览器屏幕上拖动的组件。
在 MainApp.js 中,我们将输入以下代码:
代码片段(MainApp.js):
import React, { Component } from 'react';
import './MainApp.css';
import Dialog from '../Components/Dialog';
export default class MainApp extends Component {
constructor(props) {
super(props);
this.state = {
showDialog: false
}
}
_showDialog() {
this.setState({showDialog: !this.state.showDialog});
}
render() {
return (
<div className='MainApp'>
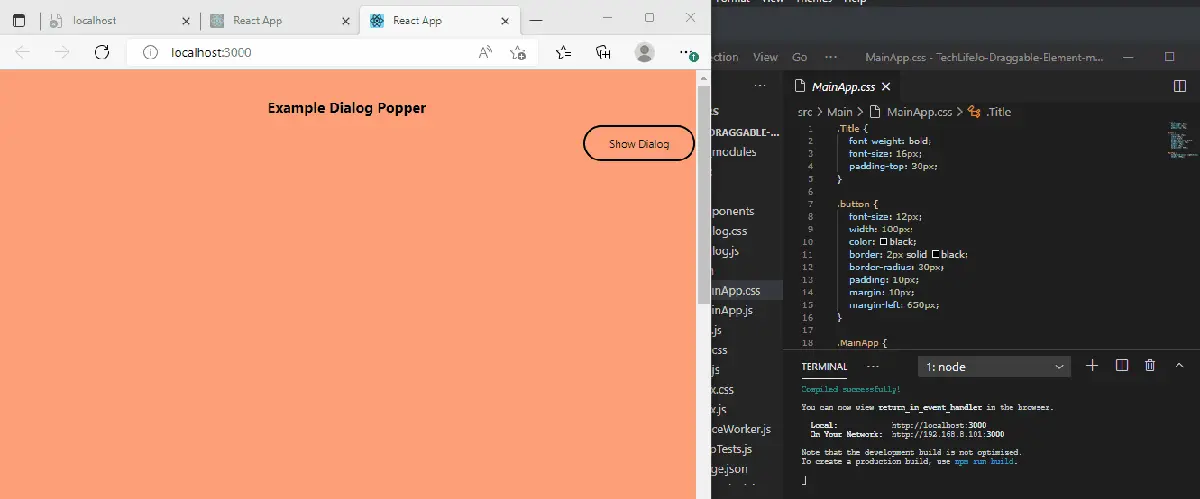
<div className='Title'>Example Dialog Popper</div>
<div className='button' onClick={this._showDialog.bind(this)}> Show Dialog </div>
<Dialog onClose={this._showDialog.bind(this)} show={this.state.showDialog}/>
</div>
);
}
}
在这个页面上,一旦点击 Show Dialog 按钮,onClick 事件监听器被激活,并且它弹出我们想要拖动的组件。
MainApp.css 包含美化页面的样式:
代码片段(MainApp.css):
.Title {
    font-weight: bold;
    font-size: 16px;
    padding-top: 30px;
}

.button {
    font-size: 12px;
    width: 100px;
    color: black;
    border: 2px solid black;
    border-radius: 30px;
    padding: 10px;
    margin: 10px;
    margin-left: 650px;
}

.MainApp {
    background-color: lightsalmon;
    height: 1000px;
}
我们移动到这个例子的最佳部分,我们创建了可拖动组件。我们进入 Dialog.js,然后进行一些编码:
代码片段(Dialog.js):
import React, { Component } from 'react';
import './Dialog.css';

export default class Dialog extends Component {
    constructor(props) {
        super(props);

        this.state = {
            diffX: 0,
            diffY: 0,
            dragging: false,
            styles: {}
        }

        this._dragStart = this._dragStart.bind(this);
        this._dragging = this._dragging.bind(this);
        this._dragEnd = this._dragEnd.bind(this);
    }

    _dragStart(e) {
        this.setState({
            diffX: e.screenX - e.currentTarget.getBoundingClientRect().left,
            diffY: e.screenY - e.currentTarget.getBoundingClientRect().top,
            dragging: true
        });
    }

    _dragging(e) {

        if(this.state.dragging) {
            var left = e.screenX - this.state.diffX;
            var top = e.screenY - this.state.diffY;

            this.setState({
                styles: {
                    left: left,
                    top: top
                }
            });
        }
    }

    _dragEnd() {
        this.setState({
            dragging: false
        });
    }

    render() {
        var classes = this.props.show ? 'Dialog' : 'Dialog hidden';
        return (
            <div className={classes} style={this.state.styles} onMouseDown={this._dragStart} onMouseMove={this._dragging} onMouseUp={this._dragEnd}>
                <div className='DialogTitle'>My Dialog</div>
                <div className='Contents'>
                    Contents of the Dialog:
                        - one
                        - two
                        - three
                </div>
                <div className='closeButton' onClick={this.props.onClose}>
                    Close
                </div>
            </div>
        );
    }
}
我们定义了我们希望组件在每种情况下所处的状态。在默认状态下,组件不会移动到任何地方,我们将拖动设置为 false。
然后我们绑定组件将处于的三个状态,即 dragStart、dragging 和 dragEnd,并将每个状态分配给适合的 onMouse 事件侦听器。一旦鼠标放在组件上,onMouseDown 激活,然后分配给 _dragStart 的函数开始工作。
onMouseMove 表示正在拖动组件,这将激活分配给 _dragging 的功能。
最后,onMouseUp 表示鼠标不再放置在组件上。这将激活与 _dragEnd 相关的功能。
Dialog.css 是用于设置可拖动组件样式的代码:
代码片段(Dialog.css):
.Dialog {
    width: 400px;
    height: 400px;
    background-color: lightblue;
    border-radius: 10px;
    border: 3px solid grey;
    position: absolute;
    cursor: move;
    top: 150px;
    left: 520px;
}

.hidden {
    display: none;
}

.DialogTitle {
    font-weight: bold;
    padding-top: 10px;
    padding-bottom: 10px;
    border-bottom: 3px solid grey;
}

.Contents {
    padding-top: 50px;
    padding-bottom: 200px;
}

.closeButton {
    font-size: 12px;
    width: 100px;
    color: black;
    border: 2px solid black;
    border-radius: 25px;
    padding: 10px;
    margin: 10px;
    margin-left: 140px;
    cursor: pointer;
}
然后我们将 MainApp 导入 App.js 中,如下所示:
代码片段(App.js):
import React from 'react';
import './App.css';
import MainApp from './Main/MainApp.js';

function App() {
  return (
    <div className="App">
      <MainApp />
    </div>
  );
}

export default App;
输出:
使用 React-Draggable 依赖项使 React 组件/Div 可拖动
我们还可以利用 react 的依赖项使组件可拖动。在我们使用 npx create-react-app dragtwo 创建新项目后。
我们导航到 dragtwo 文件夹以安装依赖项。在我们的终端中,我们输入 npm install react-draggable。
然后我们会去 App.js 做一点编码:
代码片段(App.js):
import logo from './logo.svg';
import './App.css';
import Draggable from "react-draggable";

function App() {
  return (
    <Draggable>
      <img
      src="https://images.pexels.com/photos/20787/pexels-photo.jpg?auto=compress&cs=tinysrgb&h=350"
      alt="new"
      />
    </Draggable>
  );
}

export default App;
输出:
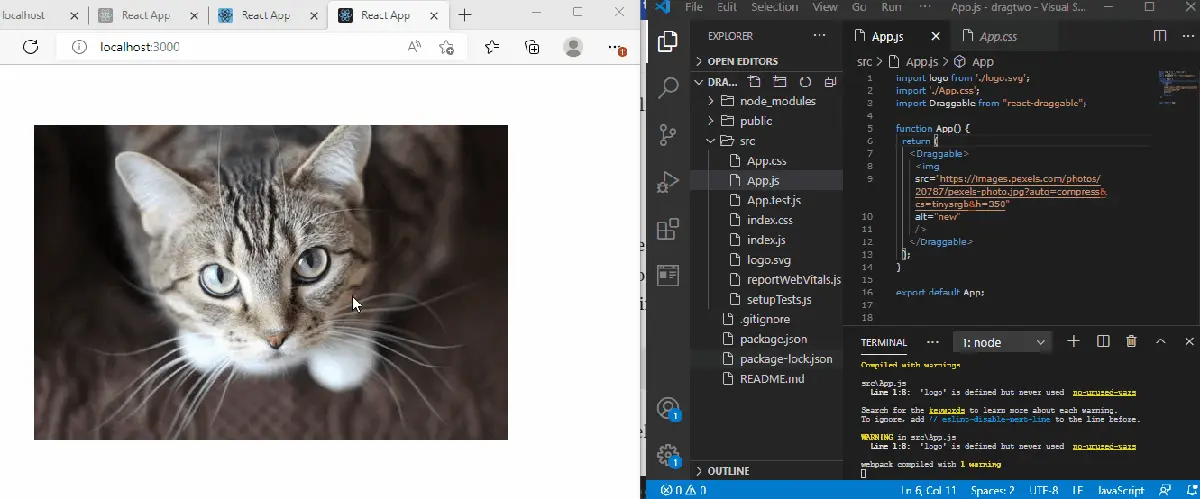
首先,我们从 react-draggable 导入 Draggable。然后我们创建可拖动的组件。
然后我们将该组件包装在 <Draggable></Draggable> 标记中。
使用漂亮的 DnD 使 React 组件/Div 可拖动
React 的 Beautiful DnD 依赖项是另一个简单易用的库,可用于使组件可拖动。
要启动,我们首先创建我们的 react 组件,然后导航到项目文件夹以安装依赖项:install react-beautiful-dnd --save。
接下来,我们打开 App.js 文件并输入以下代码:
代码片段(App.js):
import React, { useState } from 'react';
import { DragDropContext, Droppable, Draggable } from 'react-beautiful-dnd';
import './App.css';

const finalSpaceCharacters = [
  {
    id: 'james',
    name: 'James',
  },
  {
    id: 'john',
    name: 'John',
  },
  {
    id: 'israel',
    name: 'Israel',
  },
  {
    id: 'joker',
    name: 'Joker',
  },
  {
    id: 'quinn',
    name: 'Quinn',
  }
]

function App() {
  const [characters, updateCharacters] = useState(finalSpaceCharacters);

  function handleOnDragEnd(result) {
    if (!result.destination) return;

    const items = Array.from(characters);
    const [reorderedItem] = items.splice(result.source.index, 1);
    items.splice(result.destination.index, 0, reorderedItem);

    updateCharacters(items);
  }

  return (
    <div className="App">
      <header className="App-header">
        <h1>Final Space Characters</h1>
        <DragDropContext onDragEnd={handleOnDragEnd}>
          <Droppable droppableId="characters">
            {(provided) => (
              <ul className="characters" {...provided.droppableProps} ref={provided.innerRef}>
                {characters.map(({ id, name }, index) => {
                  return (
                    <Draggable key={id} draggableId={id} index={index}>
                      {(provided) => (
                        <li ref={provided.innerRef} {...provided.draggableProps} {...provided.dragHandleProps}>

                          <p>
                            {name}
                          </p>
                        </li>
                      )}
                    </Draggable>
                  );
                })}
                {provided.placeholder}
              </ul>
            )}
          </Droppable>
        </DragDropContext>
      </header>
    </div>
  );
}

export default App;
输出:
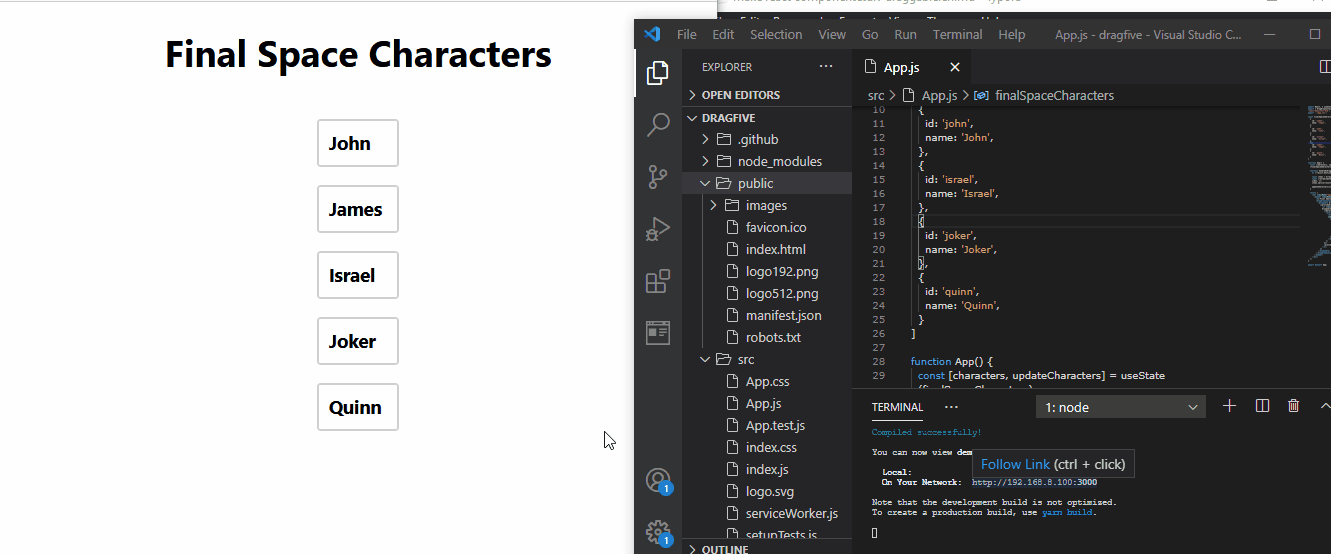
要启动,我们首先创建一个需要拖动和重新排序的名称数组。然后我们使用拼接方法,这样一旦我们将一个项目从它的位置取出,它就会自动被下一个项目替换。
接下来,我们创建处理项目拖放的函数。在创建用于拖动组件的函数之后,我们将所有这些函数包装在 <Draggable></Draggable> 标记中。
我们创建用于放置项目的函数,并将其包装起来,包括 <Droppable></Droppable> 内的 draggable 标签中的函数,然后我们将所有这些包装在 <DragDropContext></DragDropContext>中标签。
结论
React 的灵活性使得几乎每个项目都可以直接创建。React 拖动功能对于为用户创建游戏和易于使用的应用程序非常有用。

Fisayo is a tech expert and enthusiast who loves to solve problems, seek new challenges and aim to spread the knowledge of what she has learned across the globe.
LinkedIn