使用 jQuery 在悬停时显示工具提示消息
- jQuery-UI 工具提示
-
使用带有
options参数的tooltip()方法使用 jQuery 在悬停时显示工具提示消息 -
使用带有
actions参数的tooltip()方法使用 jQuery 在悬停时显示工具提示消息
Tooltip 是一个来自 jQuery-UI 的小部件,用于添加新主题并允许自定义。本教程演示了如何使用 jQuery-UI 工具提示。
jQuery-UI 工具提示
来自 jQuery 的 Tooltip 用于允许自定义和创建新主题。工具提示附加到任何元素;为了显示它们,我们为它们添加了一个标题属性,它将用作工具提示。
当我们将鼠标悬停在该元素上时,带有 title 属性的工具提示将可见。jQuery-UI 提供了一个方法 tooltip(),它可以为任何元素添加工具提示。
tooltip() 方法在显示和隐藏工具提示时默认提供淡入淡出动画。
此方法的语法是:
Method 1:
$(selector, context).tooltip (options)

Method 2:
$(selector, context).tooltip ("action", [params])
有两种方法可以使用 tooltip() 方法。
使用带有 options 参数的 tooltip() 方法使用 jQuery 在悬停时显示工具提示消息
第一个带有 options 参数的方法用于指定工具提示的行为和外观。参数 options 可以多次插入并且有多种类型。
下表显示了 options 的类型:
| 选项 | 描述 |
|---|---|
content |
此选项使用函数的默认值表示工具提示的内容,该值返回 title 属性。 |
disabled |
此选项用于禁用具有 true 或 false 值的工具提示。 |
hide |
此选项表示隐藏工具提示时的动画。值为真或假。 |
show |
此选项表示工具提示在显示时的动画。值为真或假。 |
track |
此选项在使用工具提示时跟踪鼠标。默认值为假。 |
items |
此选项用于选择哪个项目将显示工具提示。默认值为标题 |
position |
此选项用于决定工具提示的位置。默认值是返回标题属性的函数。 |
tooltip class |
此选项表示可以添加到工具提示的类。它可以表示警告或错误;此选项的默认值为 null。 |
首先,让我们尝试一个没有参数的简单 tooltip() 示例。确保导入 jQuery-UI,以便 tooltip() 方法可以工作。
参见示例:
<!doctype html>
<html lang = "en">
<head>
<meta charset = "utf-8">
<title>jQuery Tooltip</title>
<script src = "https://code.jquery.com/jquery-1.10.2.js"></script>
<script src = "https://code.jquery.com/ui/1.10.4/jquery-ui.js"></script>
<link href = "https://code.jquery.com/ui/1.10.4/themes/ui-lightness/jquery-ui.css" rel = "stylesheet">
<script>
$(function() {
$("#Demotooltip1").tooltip();
$("#Demotooltip2").tooltip();
});
</script>
</head>
<body>
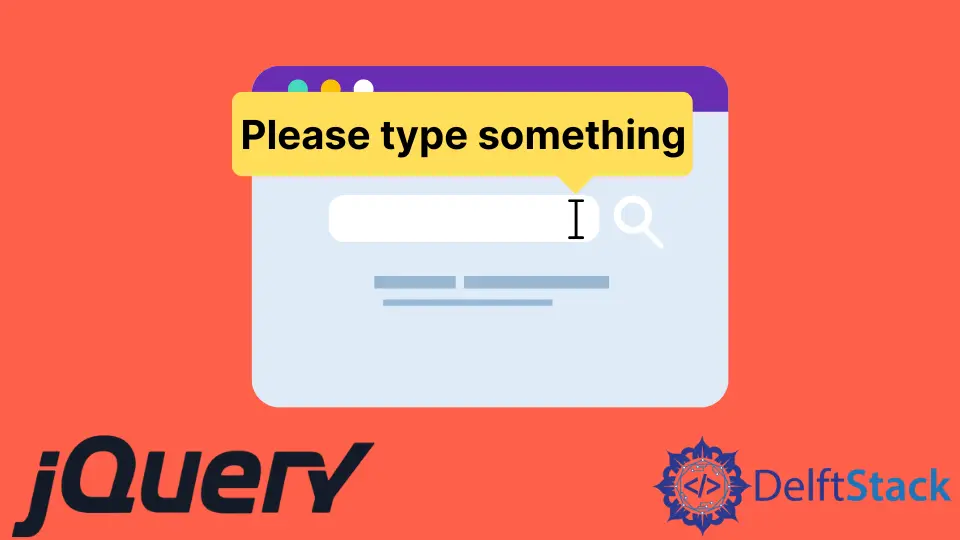
Type Something: <input id = "Demotooltip1" title = "Please Type Something">
<p><label id = "Demotooltip2" title = "This is tooltip Demo"> Hover Here to See Tooltip </label></p>
</body>
</html>
上面的代码将在文本输入和标签上显示工具提示。见输出:
现在,让我们尝试一个带有 content、disabled 和 track 选项的示例:
<!doctype html>
<html lang = "en">
<head>
<meta charset = "utf-8">
<title>jQuery Tooltip </title>
<link href = "https://code.jquery.com/ui/1.10.4/themes/ui-lightness/jquery-ui.css" rel = "stylesheet">
<script src = "https://code.jquery.com/jquery-1.10.2.js"></script>
<script src = "https://code.jquery.com/ui/1.10.4/jquery-ui.js"></script>
<script>
$(function() {
$( "#Demotooltip1" ).tooltip({
content: "Tooltip from Content",
track:true
}),
$( "#Demotooltip2" ).tooltip({
disabled: true
});
});
</script>
</head>
<body>
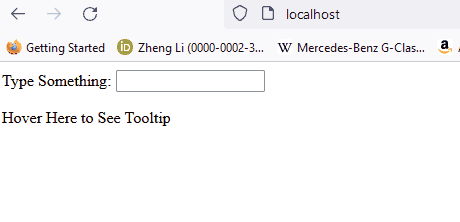
Type Something: <input id = "Demotooltip1" title = "Original">
<br><br>
Disabled Tooltip: <input id = "Demotooltip2" title = "Demotooltip">
</body>
</html>
上面的代码演示了如何使用 content、track 和 disabled 选项。见输出:
让我们再尝试一个带有选项 position 的示例。参见示例:
<!doctype html>
<html lang = "en">
<head>
<meta charset = "utf-8">
<title>jQuery Tooltip</title>
<link href = "https://code.jquery.com/ui/1.10.4/themes/ui-lightness/jquery-ui.css" rel = "stylesheet">
<script src = "https://code.jquery.com/jquery-1.10.2.js"></script>
<script src = "https://code.jquery.com/ui/1.10.4/jquery-ui.js"></script>
<style>
body {
margin-top: 50px;
}
.ui-tooltip-content::after, .ui-tooltip-content::before {
position: absolute;
content: "";
display: block;
left: 100px;
border-style: solid;
}
.ui-tooltip-content::before {
bottom: -5px;
border-width: 5px 5px 0;
border-color: #AAA transparent;
}
.ui-tooltip-content::after {
bottom: -7px;
border-width: 10px 10px 0;
border-color: white transparent;
}
</style>
<script>
$(function() {
$( "#Demotooltip" ).tooltip({
position: {
my: "center bottom",
at: "center top-10",
collision: "none"
}
});
});
</script>
</head>
<body>
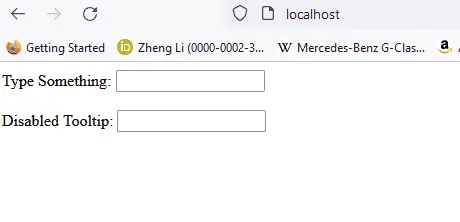
Type Something: <input id = "Demotooltip" title = "Please Type Something.">
</body>
</html>
上面的代码显示了 position 选项的演示,它为工具提示添加了一个提示。见输出:
类似地,其他选项可用于上表中描述的目的。现在,让我们看看方法 2。
使用带有 actions 参数的 tooltip() 方法使用 jQuery 在悬停时显示工具提示消息
$ (selector, context).tooltip ("action", [params]) 方法将对元素执行操作,例如禁用工具提示。action 表示第一个参数中的字符串,params 将根据给定的操作提供。
action 有多种类型,如下表所示:
| 行动 | 描述 |
|---|---|
close |
此操作用于关闭工具提示。它没有论据。 |
destroy |
此操作将完全删除工具提示。它没有论据。 |
disable |
此操作将停用工具提示。它没有论据。 |
enable |
此操作将激活工具提示。它没有论据。 |
open |
此操作将以编程方式打开工具提示。没有争论。 |
option() |
此操作将获取表示当前工具提示选项哈希的键值对。 |
option(Options) |
此操作用于设置工具提示的选项。 |
option(OptionName) |
这个动作是为了获取 OptionName 的值。没有其他论据。 |
option(OptionName, value) |
此操作将根据给定值设置 OptionName 的值。 |
widget |
此操作将返回一个包含原始元素的 jQuery 对象。没有参数。 |
让我们为 open 和 close 操作尝试一个简单的示例,这将通过按下按钮保持工具提示打开并在按下另一个按钮时将其关闭。参见示例:
<!doctype html>
<html lang = "en">
<head>
<meta charset = "utf-8">
<title>jQuery Tooltip</title>
<link href = "https://code.jquery.com/ui/1.10.4/themes/ui-lightness/jquery-ui.css"
rel = "stylesheet">
<script src = "https://code.jquery.com/jquery-1.10.2.js"></script>
<script src = "https://code.jquery.com/ui/1.10.4/jquery-ui.js"></script>
<script>
$(function() {
$("#Demotooltip").tooltip({
//the 'of' keyword will be used to link the tooltip to the specified input
position: { of: '#DemoInput', my: 'left center', at: 'left center' },
}),
$('#DemoButton1').click(function () {
$('#Demotooltip').tooltip("open");
});
$('#DemoButton2').click(function () {
$('#Demotooltip').tooltip("close");
});
});
</script>
</head>
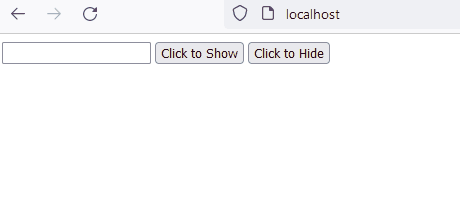
<body >
<label id = "Demotooltip" title = "Open and Close"></label>
<input id = "DemoInput" type = "text" size = "20" />
<input id = "DemoButton1" type = "submit" value = "Click to Show" />
<input id = "DemoButton2" type = "submit" value = "Click to Hide" />
</body>
</html>
上面的代码将在按钮单击时打开和关闭工具提示。见输出:
现在,让我们尝试一个 widget 动作的示例。widget 方法用于获取 jQuery-UI 的实例。
参见示例:
<!DOCTYPE html>
<html lang="en">
<head>
<meta charset="utf-8" />
<link href= "https://code.jquery.com/ui/1.10.4/themes/ui-lightness/jquery-ui.css" rel="stylesheet"/>
<script src= "https://code.jquery.com/jquery-1.10.2.js"> </script>
<script src= "https://code.jquery.com/ui/1.10.4/jquery-ui.js"> </script>
<script>
$(function () {
$("#Demo2").tooltip({
track: true,
});
$("#Demo1").click(function () {
var a = $("#Demo2").tooltip("widget");
console.log(a);
});
});
</script>
</head>
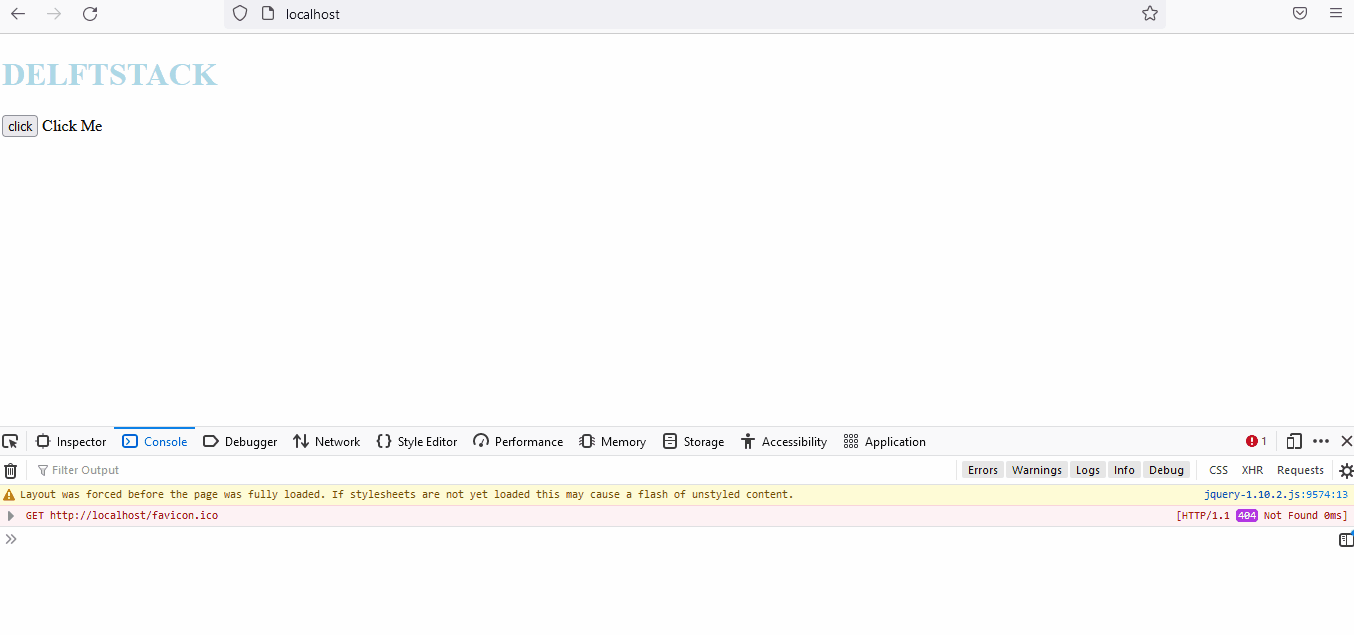
<body>
<h1 style="color: lightblue">DELFTSTACK</h1>
<input id="Demo1" type="submit" name="delftstack" value="click" />
<span id="Demo2" title="delftstack"> Click Me</span>
</body>
</html>
上面的代码将使用 widget 方法来获取 jQuery-UI 的实例。见输出:
类似地,其他动作也可以用于表中描述的目的。

Sheeraz is a Doctorate fellow in Computer Science at Northwestern Polytechnical University, Xian, China. He has 7 years of Software Development experience in AI, Web, Database, and Desktop technologies. He writes tutorials in Java, PHP, Python, GoLang, R, etc., to help beginners learn the field of Computer Science.
LinkedIn Facebook