在 Angular 中创建导航栏

本教程将介绍如何在 Angular 中创建导航栏并将其用于 Angular 应用程序中的导航。
Angular 中的导航栏
导航栏是任何 Web 应用程序的重要组成部分之一。即使在构建仅包含一个页面但不同部分的单页应用程序 (SPA) 时,我们仍然使用导航栏从一个部分导航到另一个部分。
导航栏使用户可以轻松地在你的 Web 应用程序中找到他们正在寻找的内容。
导航有很多方法可以实现从简单到复杂的路由。Angular 提供了一个单独的模块,可以帮助我们在 Web 应用程序中创建导航栏并将其用于导航。
如果我们想以编程方式将用户从一个页面导航到另一个页面,我们可以使用路由 navigate() 方法,这意味着我们在不使用确切链接的情况下导航组件。我们使用组件名称来代替。
在 Angular 中创建导航栏
让我们来看一个示例,在该示例中,我们将创建一个导航栏,并使用 navigate() 在不同的组件中导航。因此,让我们使用以下命令创建一个新应用程序。
# angular
ng new my-app
创建我们的新应用程序后,我们将使用此命令转到我们的应用程序目录。
# angular
cd my-app
现在,让我们运行我们的应用程序以确保正确安装所有依赖项。
# angular
ng serve --open
在 Angular 中生成导航栏组件
现在,让我们生成导航栏组件。首先,我们将生成我们的 index 组件,它将充当我们应用程序的 home 组件。
# angular
ng generate component index
然后,我们将生成 about us 组件。
# angular
ng generate component aboutUs
最后,我们将使用以下命令生成我们的 products 组件。
# angular
ng generate component products
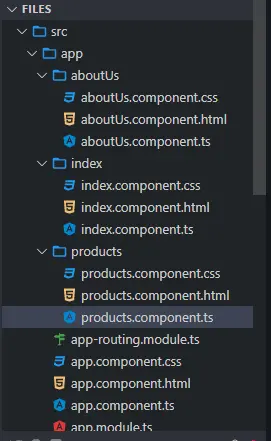
我们将在带有 3 个文件的单独文件夹中包含 3 个组件,你可以在下面看到。
输出:
为组件创建视图
现在,我们将为我们的组件创建视图。首先,我们将从 about 文件夹打开 aboutUs.component.html 并添加以下代码。
# angular
<div class="container" >
  <h1> This is about Us Component </h1>
  <h3> This is the content of About Us </h3>
</div>
接下来,我们将打开 home 文件夹中的 index.component.html 文件并添加以下代码。
# angular
<div class="container">
 <h1> This is index component </h1>
  <h3> This is the content of Index </h3>
</div>
我们将打开 services 文件夹中的 products.component.html 文件并添加以下代码。
# angular
<div class="container">
 <h1> This is products component </h1>
  <h3> This is the content of Products </h3>
</div>
定义组件路由
一旦我们创建了我们的组件和视图,我们将在 app-routing.module.ts 中定义我们的路由。
我们将导入 ngModule。我们还将从路由中导入 Routes 和 RouterModule,最后但并非最不重要的是,我们刚刚创建的组件。
# angular
import { NgModule } from '@angular/core';
import { Routes, RouterModule } from '@angular/router';
import { AboutUsComponent}  from './aboutUs/aboutUs.component';
import { IndexComponent} from './index/index.component';
import { ProductsComponent } from './products/products.component';

@NgModule({
  imports: [RouterModule.forRoot(routes)],
  exports: [RouterModule]
})
export class AppRoutingModule { }
导入后,我们将定义我们组件的路由,如下所示。
# angular
const routes: Routes = [

    { path: 'aboutUs', component: AboutUsComponent },
    { path: 'index', component: IndexComponent},
    { path: 'products', component: ProductsComponent },
 ];
创建导航菜单
然后我们将在 app.component.html 中创建导航菜单。每个链接都将使用 (click) 方法调用一个函数。
我们将使用 router-outlet 显示组件数据,如下所示。
# angular
<ul class="nav navbar-nav">
  <li>
    <a (click)="goToIndex()">Home</a>
  </li>
  <li>
    <a (click)="goToAboutUs()">About Us</a>
  </li>
  <li>
    <a (click)="goToProducts()">Products</a>
  </li>
</ul>

<router-outlet> </router-outlet>
创建在组件之间导航的函数
接下来,我们将创建函数 goToIndex()、goToAboutUs() 和 goToProducts()。我们将打开 app.component.ts 并导入 Router。
使用 router.navigate(),我们将创建这些函数来在组件之间导航。
# angular
import { Component } from '@angular/core';
import { Router } from '@angular/router';


@Component({
  selector: 'my-app',
  templateUrl: './app.component.html',
  styleUrls: [ './app.component.css' ]
})
export class AppComponent  {
  constructor(private router: Router) {
  }

  goToIndex() {
    this.router.navigate(['/', 'index']);
  }
  goToAboutUs() {
    this.router.navigate(['/', 'aboutUs']);
  }
  goToProducts() {
    this.router.navigate(['/', 'products']);
  }
}
输出:
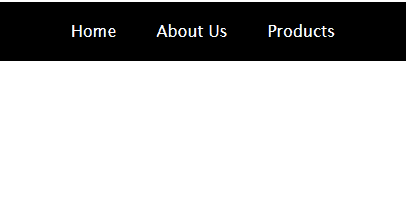
从示例中可以看出,我们可以轻松地在 Angular 应用程序中创建导航栏,并使用 navigate() 在组件之间导航并定义路由。
你可以在此处访问本教程中使用的完整代码。

Rana is a computer science graduate passionate about helping people to build and diagnose scalable web application problems and problems developers face across the full-stack.
LinkedIn