从 Angular 中的子控制器访问父范围

我们将介绍如何从 Angular 中的子控制器访问父范围。
从 Angular 中的子控制器访问父范围
当我们在基于组件的库或框架上工作时,有很多场景需要在两个组件之间共享数据。
首先,我们将创建一个 users 组件。
# angular CLI
ng g c users
上面的命令将生成一个新的 users 组件。
我们可以看到 app 文件夹内会有一个新的 users 文件夹。为了显示我们的 users 组件,我们需要使用 user.component.ts 中设置的 users selector。
所以让我们在 app 组件中显示 users 组件。首先,我们需要在 app.module.ts 的声明中添加 UsersComponent。
因此,app.module.ts 将如下所示。
# angular
import { NgModule } from '@angular/core';
import { BrowserModule } from '@angular/platform-browser';
import { FormsModule } from '@angular/forms';

import { AppComponent } from './app.component';
import { HelloComponent } from './hello.component';
import { UsersComponent } from './users/users.component';

@NgModule({
  imports:      [ BrowserModule, FormsModule ],
  declarations: [ AppComponent, HelloComponent, UsersComponent],
  bootstrap:    [ AppComponent ]
})
export class AppModule { }
我们需要在 app.component.html 中创建一个带有用户选择器的标签,它将显示我们在 users.component.html 中添加的任何内容。app.component.html 中的代码如下所示。
# angular
<hello name="{{ name }}"></hello>
<p>Start editing to see some magic happen :)</p>
<app-users></app-users>
输出:
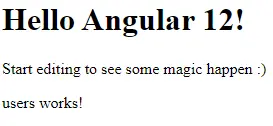
如图所示,app-users 标签显示了 users works!因为,在 users.component.html 中,我们有以下代码。
# angular
<p>users works!</p>
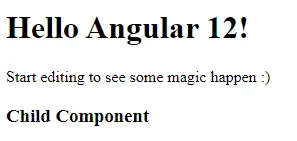
让我们将其转换为标题并从父组件发送数据。
首先,我们将把 <p> 标签更改为 <h3>。
# angular
<h3>Child Component</h3>
输出:
我们将简单的数据从父组件发送到子组件。我们将在 app.component.ts 文件中定义一个变量,因此我们的代码如下。
# angular
import { Component, VERSION } from '@angular/core';

@Component({
  selector: 'my-app',
  templateUrl: './app.component.html',
  styleUrls: [ './app.component.css' ]
})
export class AppComponent  {
  name = 'Angular ' + VERSION.major;
  data = "User Name"
}
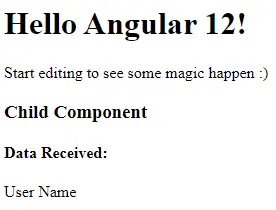
如代码所示,我们将用户名分配给数据;让我们将此数据发送到子组件。因此,app.component.html 将如下所示。
# angular
<hello name="{{ name }}"></hello>
<p>Start editing to see some magic happen :)</p>
<app-users [data] = "data"></app-users>
通过将 [data] 与变量 data 绑定,我们向子组件发送数据,但它还没有完全绑定。
我们必须在 users.component.ts 文件中导入 input。Input 是一个装饰器,它将读取我们发送给子组件的数据并将其显示在子组件中。
在我们的 UsersComponent 类中,我们将读取我们在 app-users 标记内的 app.component.html 中绑定的属性。因此,我们在 users.component.ts 中的代码将如下所示。
# angular
import { Component, OnInit, Input } from '@angular/core';

@Component({
  selector: 'app-users',
  templateUrl: './users.component.html',
  styleUrls: ['./users.component.css']
})
export class UsersComponent implements OnInit {
  @Input() data
  constructor() { }

  ngOnInit() {
  }
}
如代码所示,我们使用@Input() data 绑定 app.component.html 中 app-users 标记的 [data]。我们将在 users.component.html 文件中显示我们收到的数据。
# angular
<h3>Child Component</h3>
<h4>Data Recieved:</h4>
<p>{{data}}</p>
输出:
我们已经从父组件接收到子组件的数据。我们现在将讨论如何从父级到子级共享对象。
让我们尝试通过更改我们发送的数据来共享一个对象。
# angular
data = {
    name: 'Rana Hasnain',
    age: 25
  }
输出:
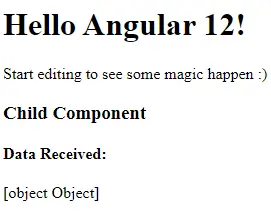
我们可以看到我们显示的是 [object Object],而不是来自该对象的数据。我们现在必须做的是修改 users.component.html 文件中的代码并将 {{data}} 更改为 {{data.name}} 或 {{data.age}},并且它将显示对象。
# angular
<h3>Child Component</h3>
<h4>Data Received:</h4>
<p>Name: {{ data.name }}</p>
<p>Age: {{ data.age }}</p>
输出:

所以现在我们可以看到我们已经从父组件到子组件共享数据和对象。

Rana is a computer science graduate passionate about helping people to build and diagnose scalable web application problems and problems developers face across the full-stack.
LinkedIn