Angular의 자식 컨트롤러에서 부모 범위에 액세스

Angular의 자식 컨트롤러에서 부모 범위에 액세스하는 방법을 소개합니다.
Angular의 자식 컨트롤러에서 부모 범위에 액세스
구성 요소 기반 라이브러리나 프레임워크에서 작업할 때 두 구성 요소 간에 데이터를 공유해야 하는 시나리오가 많이 있습니다.
먼저 users 구성 요소를 만듭니다.
# angular CLI
ng g c users
위의 명령은 새로운 users 구성 요소를 생성합니다.
앱 폴더 안에 새 사용자 폴더가 있는 것을 볼 수 있습니다. users 구성 요소를 표시하려면 user.component.ts에 설정된 users 선택기를 사용해야 합니다.
이제 app 구성 요소 내부에 users 구성 요소를 표시해 보겠습니다. 먼저 app.module.ts의 선언에 UsersComponent를 추가해야 합니다.
따라서 app.module.ts는 아래와 같이 보일 것입니다.
# angular
import { NgModule } from '@angular/core';
import { BrowserModule } from '@angular/platform-browser';
import { FormsModule } from '@angular/forms';

import { AppComponent } from './app.component';
import { HelloComponent } from './hello.component';
import { UsersComponent } from './users/users.component';

@NgModule({
  imports:      [ BrowserModule, FormsModule ],
  declarations: [ AppComponent, HelloComponent, UsersComponent],
  bootstrap:    [ AppComponent ]
})
export class AppModule { }
app.component.html에서 사용자 선택기로 태그를 만들어야 하며 users.component.html에 추가한 모든 항목이 표시됩니다. app.component.html의 코드는 다음과 같습니다.
# angular
<hello name="{{ name }}"></hello>
<p>Start editing to see some magic happen :)</p>
<app-users></app-users>
출력:
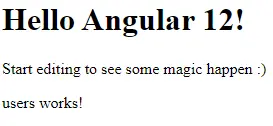
사진에서 볼 수 있듯이 app-users 태그에는 users works!가 표시됩니다. users.component.html에 다음 코드가 있기 때문입니다.
# angular
<p>users works!</p>
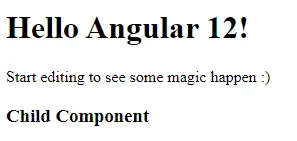
헤더로 변환하여 상위 컴포넌트에서 데이터를 보내봅시다.
먼저 <p> 태그를 <h3>로 변경합니다.
# angular
<h3>Child Component</h3>
출력:
상위 구성 요소에서 하위 구성 요소로 간단한 데이터를 보냅니다. app.component.ts 파일 내부에 변수를 정의하므로 코드는 아래와 같습니다.
# angular
import { Component, VERSION } from '@angular/core';

@Component({
  selector: 'my-app',
  templateUrl: './app.component.html',
  styleUrls: [ './app.component.css' ]
})
export class AppComponent  {
  name = 'Angular ' + VERSION.major;
  data = "User Name"
}
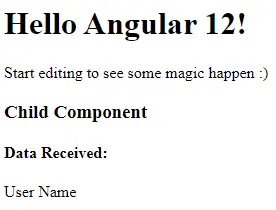
코드에서 볼 수 있듯이 User Name을 data에 할당했습니다. 이 data를 자식 구성 요소로 보내도록 하겠습니다. 따라서 app.component.html은 아래와 같을 것입니다.
# angular
<hello name="{{ name }}"></hello>
<p>Start editing to see some magic happen :)</p>
<app-users [data] = "data"></app-users>
[data]를 변수 data와 바인딩하여 하위 구성 요소에 데이터를 보내지만 아직 완전히 바인딩되지는 않았습니다.
users.component.ts 파일에서 input을 가져와야 합니다. Input은 자식 구성 요소에 보낸 데이터를 읽고 자식 구성 요소에 표시하는 데코레이터입니다.
UsersComponent 클래스 내에서 app-users 태그 내 app.component.html에 바인딩된 속성을 읽습니다. 따라서 users.component.ts의 코드는 다음과 같습니다.
# angular
import { Component, OnInit, Input } from '@angular/core';

@Component({
  selector: 'app-users',
  templateUrl: './users.component.html',
  styleUrls: ['./users.component.css']
})
export class UsersComponent implements OnInit {
  @Input() data
  constructor() { }

  ngOnInit() {
  }
}
코드에서 볼 수 있듯이 app.component.html의 app-users 태그에서 [data]를 바인딩하기 위해 @Input() data를 사용했습니다. 수신한 데이터는 users.component.html 파일에 표시됩니다.
# angular
<h3>Child Component</h3>
<h4>Data Recieved:</h4>
<p>{{data}}</p>
출력:
상위 구성 요소에서 하위 구성 요소로 데이터를 받았습니다. 이제 부모에서 자식으로 객체를 공유하는 방법에 대해 논의할 것입니다.
우리가 보내는 데이터를 변경하여 개체를 공유해 봅시다.
# angular
data = {
    name: 'Rana Hasnain',
    age: 25
  }
출력:
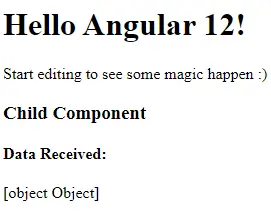
해당 객체의 데이터 대신 [object Object]가 표시되는 것을 볼 수 있습니다. 이제 users.component.html 파일에서 코드를 수정하고 {{data}}를 {{data.name}} 또는 {{data.age}}로 변경하고 그것은 개체를 표시합니다.
# angular
<h3>Child Component</h3>
<h4>Data Received:</h4>
<p>Name: {{ data.name }}</p>
<p>Age: {{ data.age }}</p>
출력:

이제 상위 구성 요소에서 하위 구성 요소로 데이터와 개체를 공유했음을 알 수 있습니다.

Rana is a computer science graduate passionate about helping people to build and diagnose scalable web application problems and problems developers face across the full-stack.
LinkedIn