Angular의 이벤트 이미터
angular에서 EventEmitter를 소개하고 angular에서 EventEmitter의 올바른 사용을 소개합니다. 그리고 Angular에서 EventEmitter의 예도 제공합니다.
Angular의 EventEmitter 란 무엇입니까?
EventEmitter는 emit() 및 subscribe() 메서드를 사용하여 구성 요소 간에 데이터를 공유하는 데 도움이 되는 모듈입니다. EventEmitter는 변경 사항과 값을 관찰하고 해당 EventEmitter 인스턴스를 구독하는 구성 요소로 데이터를 방출하는 Observables 레이어에 있습니다.
emit()
emit()는 주어진 값을 포함하는 이벤트를 내보내는 ‘EventEmitter’ 메서드입니다.
# angular
emit(value?: A): void
emit()에는 ‘값’이라는 매개변수가 하나만 있습니다.
subscribe()
subscribe()는 이 인스턴스에서 발생하는 이벤트에 대한 핸들러를 등록하는 EventEmitter 메서드입니다.
# angular
subscribe(next?: (value: A) => void, error?: (error: any) => void, complete?: () => void) : Subscription
subscribe()에는 EventEmitter에서 값, 오류 또는 완료 알림을 전달하는 데 사용할 수 있는 세 가지 선택적 매개변수가 있습니다.
next매개변수는 방출된 이벤트에 대한 사용자 정의 핸들러입니다.error매개변수는 이 이미터의 오류 알림에 대한 사용자 지정 처리기입니다.complete매개변수는 이 이미터의 완료 알림에 대한 사용자 지정 핸들러입니다.
Angular에서 EventEmitter 사용
이제 EventEmitter를 예제로 사용하여 완전히 이해하겠습니다. 이 예에서는 구성 요소의 배경색과 글꼴 색을 변경하고 해당 값을 다른 구성 요소에 표시합니다.
따라서 먼저 app.module.ts 파일을 설정하고 모듈과 구성 요소를 가져옵니다.
# angular
import { NgModule } from '@angular/core';
import { BrowserModule } from '@angular/platform-browser';
import { FormsModule } from '@angular/forms';

import { AppComponent } from './app.component';
import { HelloComponent } from './hello.component';
import { BgChangeComponent } from './bg-change.component';

@NgModule({
  imports: [BrowserModule, FormsModule],
  declarations: [AppComponent, HelloComponent, BgChangeComponent],
  bootstrap: [AppComponent],
})
export class AppModule {}
이제 앱 구성 요소에 대한 html 파일을 설정하고 app.component.html 파일에 다음 코드를 추가합니다.
# angular
<emitted (touch)="respond()" name="{{ name }}" [color]="color"></emitted>
<p>{{ response }}</p>
<p>{{ color }}</p>
<bg-change (colorChange)="changeColor($event)"></bg-change>
여기에서 EventEmitter인 changeColor($event)를 사용했으며 response 및 color에 EventEmitter의 값을 표시하고 있습니다.
이제 app.component.ts 파일을 설정하고 처음 페이지가 로드될 때 표시되는 name, response 및 color 변수에 대한 값을 설정합니다.
respond()의 값을 변경하는 respond() 함수를 정의합니다.
색상 값을 설정하는 changeColor() 함수도 정의합니다. 따라서 app.component.ts 파일은 다음과 같습니다.
# angular
import { Component } from '@angular/core';
@Component({
selector: 'my-app',
templateUrl: './app.component.html',
styleUrls: [ './app.component.css' ]
})
export class AppComponent {
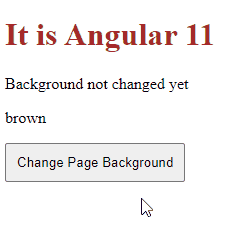
name = 'Angular 11';
response = 'Background not changed yet';
color = 'brown';
respond() {
this.response = 'Success';
}
changeColor(color) {
this.color = color;
}
}
이제 hello.component.ts 파일을 편집하고 다음 코드를 추가합니다.
# angular
import {
  Component,
  Input,
  ElementRef,
  Renderer2,
  Output,
  EventEmitter,
  OnInit,
  OnChanges,
} from '@angular/core';

@Component({
  selector: 'emitted',
  template: `<h1
  (click)="emit()"
  >{{text}} {{name}}</h1>`,
})
export class HelloComponent implements OnInit, OnChanges {
  @Input() name: string;

  @Input() color = 'brown';

  text = 'It is';

  @Output()
  touch = new EventEmitter<string>();

  constructor(private renderer: Renderer2, private el: ElementRef) {}

  ngOnInit() {
    this.renderer.setStyle(this.el.nativeElement, 'color', this.color);
  }

  ngOnChanges() {
    this.renderer.setStyle(this.el.nativeElement, 'color', this.color);
  }

  emit() {
    this.touch.emit('touched');
  }
}
위 컴포넌트에서 @component는 app.component.html 파일에서 emitted 태그를 가져와 초기화 시 색상을 설정합니다. 버튼을 클릭하면 색상이 변경됩니다. 로드 시 표시되는 text도 전달합니다.
이제 새로운 bg-change.component.ts 파일을 추가합니다. 그리고 그 안에 다음 코드를 추가합니다.
# angular
import {
  Component,
  ViewChild,
  ElementRef,
  Renderer2,
  EventEmitter,
  Output,
} from '@angular/core';

@Component({
  selector: 'bg-change',
  template: `<button
  (click)="Bgchange()"
  >{{content}}</button>`,
  styles: [`button { padding: 10px; }`],
})
export class BgChangeComponent {
  body = this.el.nativeElement.ownerDocument.body;

  activateColor = 'white';

  @Output()
  colorChange = new EventEmitter<string>();

  content = 'Change Page Background';

  constructor(private renderer: Renderer2, private el: ElementRef) {}

  Bgchange() {
    this.colorChange.emit(this.activateColor);

    this.activateColor === 'white'
      ? (this.activateColor = 'red')
      : (this.activateColor = 'white');

    this.renderer.setStyle(this.body, 'background', this.activateColor);
  }
}
따라서 우리의 출력은 아래와 같을 것입니다.

Rana is a computer science graduate passionate about helping people to build and diagnose scalable web application problems and problems developers face across the full-stack.
LinkedIn