Angular 中的事件发射器

我们将在 Angular 中介绍 EventEmitter 以及在 Angular 中正确使用 EventEmitter。我们还将给出一个 Angular 的 EventEmitter 示例。
什么是 Angular 中的 EventEmitter
EventEmitter 是一个使用 emit() 和 subscribe() 方法帮助在组件之间共享数据的模块。EventEmitter 位于 Observables 层,它观察变化和值并将数据发送到订阅了该 EventEmitter 实例的组件。
emit()
emit() 是一个 EventEmitter 方法,它发出包含给定值的事件。
# angular
emit(value?: A): void
emit() 只有一个参数,value。
subscribe()
subscribe() 是一个 EventEmitter 方法,它为该实例发出的事件注册处理程序。
# angular
subscribe(next?: (value: A) => void, error?: (error: any) => void, complete?: () => void) : Subscription
subscribe() 具有三个可选参数,可用于在 EventEmitter 中传递值、错误或完成通知。
next参数是已发出事件的自定义处理程序。error参数是来自此发射器的错误通知的自定义处理程序。complete参数是来自此发射器的完成通知的自定义处理程序。
在 Angular 中使用 EventEmitter
现在,我们将使用 EventEmitter 作为示例来完全理解它。在本例中,我们将更改组件的背景颜色和字体颜色,并在其他组件中显示其值。
因此,首先,我们将设置我们的 app.module.ts 文件并导入模块和组件。
# angular
import { NgModule } from '@angular/core';
import { BrowserModule } from '@angular/platform-browser';
import { FormsModule } from '@angular/forms';

import { AppComponent } from './app.component';
import { HelloComponent } from './hello.component';
import { BgChangeComponent } from './bg-change.component';

@NgModule({
  imports: [BrowserModule, FormsModule],
  declarations: [AppComponent, HelloComponent, BgChangeComponent],
  bootstrap: [AppComponent],
})
export class AppModule {}
现在,我们将为我们的应用程序组件设置 html 文件,并在 app.component.html 文件中添加以下代码
# angular
<emitted (touch)="respond()" name="{{ name }}" [color]="color"></emitted>
<p>{{ response }}</p>
<p>{{ color }}</p>
<bg-change (colorChange)="changeColor($event)"></bg-change>
这里我们使用了 changeColor($event),它是一个 EventEmitter,我们在 response 和 color 中显示来自 EventEmitter 的值。
现在我们将设置 app.component.ts 文件并设置第一次加载页面时显示的 name、response 和 color 变量的值。
我们将定义一个函数 respond(),它将改变 response 的值。
我们还将定义 changeColor() 函数,它将设置颜色的值。因此,我们的 app.component.ts 文件将如下所示:
# angular
import { Component } from '@angular/core';
@Component({
selector: 'my-app',
templateUrl: './app.component.html',
styleUrls: [ './app.component.css' ]
})
export class AppComponent {
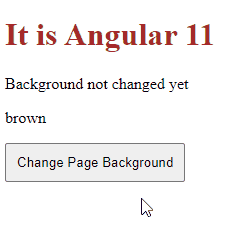
name = 'Angular 11';
response = 'Background not changed yet';
color = 'brown';
respond() {
this.response = 'Success';
}
changeColor(color) {
this.color = color;
}
}
现在我们将编辑我们的 hello.component.ts 文件并将以下代码添加到其中。
# angular
import {
  Component,
  Input,
  ElementRef,
  Renderer2,
  Output,
  EventEmitter,
  OnInit,
  OnChanges,
} from '@angular/core';

@Component({
  selector: 'emitted',
  template: `<h1
  (click)="emit()"
  >{{text}} {{name}}</h1>`,
})
export class HelloComponent implements OnInit, OnChanges {
  @Input() name: string;

  @Input() color = 'brown';

  text = 'It is';

  @Output()
  touch = new EventEmitter<string>();

  constructor(private renderer: Renderer2, private el: ElementRef) {}

  ngOnInit() {
    this.renderer.setStyle(this.el.nativeElement, 'color', this.color);
  }

  ngOnChanges() {
    this.renderer.setStyle(this.el.nativeElement, 'color', this.color);
  }

  emit() {
    this.touch.emit('touched');
  }
}
在上述组件中,@component 将从 app.component.html 文件中获取 emitted 标记,并在初始化时设置颜色。当按钮被点击时,它会改变颜色。我们还传递了加载时显示的 text。
现在我们将添加一个新的 bg-change.component.ts 文件。并在其中添加以下代码。
# angular
import {
  Component,
  ViewChild,
  ElementRef,
  Renderer2,
  EventEmitter,
  Output,
} from '@angular/core';

@Component({
  selector: 'bg-change',
  template: `<button
  (click)="Bgchange()"
  >{{content}}</button>`,
  styles: [`button { padding: 10px; }`],
})
export class BgChangeComponent {
  body = this.el.nativeElement.ownerDocument.body;

  activateColor = 'white';

  @Output()
  colorChange = new EventEmitter<string>();

  content = 'Change Page Background';

  constructor(private renderer: Renderer2, private el: ElementRef) {}

  Bgchange() {
    this.colorChange.emit(this.activateColor);

    this.activateColor === 'white'
      ? (this.activateColor = 'red')
      : (this.activateColor = 'white');

    this.renderer.setStyle(this.body, 'background', this.activateColor);
  }
}
所以我们的输出将如下所示。

Rana is a computer science graduate passionate about helping people to build and diagnose scalable web application problems and problems developers face across the full-stack.
LinkedIn