HOWTO · Java
Java の循環バッファ
このチュートリアルでは、配列とリンク リストを使用して Java で循環バッファーを生成する方法を示します。
このページの内容
このチュートリアルでは、配列とリンク リストを使用して Java で循環バッファーを生成する方法を示します。
Java の循環バッファ
循環バッファは、キューとして使用される配列として知られています。 あるプロセスから別のプロセスに絶えずデータを移動する場合、データを取得する時間がかかるため、そのデータを永続的なメモリ ロケーションに格納することはできません。
したがって、このタイプのデータは、RAM などのバッファと呼ばれる一時的な場所に保存する必要があります。 リング バッファー とも呼ばれる循環バッファーは、メモリを連続して使用できるキューです。
循環バッファは、先入れ先出しの FIFO 方式で機能し、配列またはリンク リストを使用して実装できます。 それでは、配列の学習を始めましょう。
配列を使用して Java で循環バッファーを作成する
配列を使用して循環バッファーを作成するには、配列に追加される要素の型が不明なコンストラクターで空の配列を初期化する必要があります。
図に示すように、head と tail の 2つのポインターが挿入および削除操作に使用されます。ここで、head は最初の要素で、tail は最後の要素です。
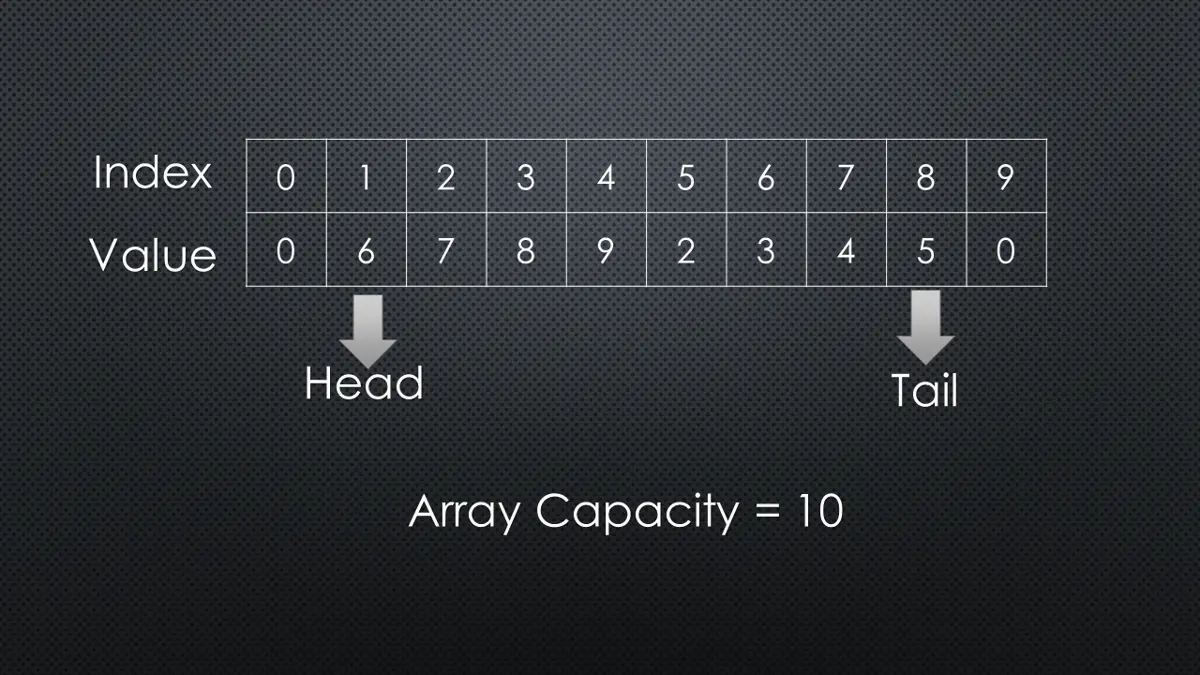
in と out は挿入と削除を意味します。
挿入操作のデモンストレーション
挿入は、いくつかの重要なポイントを持つ簡単な操作です。
-
開始時の配列サイズは
0で、headの位置は0、tailの位置は-1です。 -
次に、要素を挿入するインデックスに次の式を使用します。
int index_position = (tail_pointer + 1) % buffer_capacity array[index_position] = element; -
要素を配列に挿入すると、配列のサイズと
tailポインターは1ずつ増加します。 -
配列のサイズがその容量と等しくなると、それ以上要素を追加できなくなります。
削除操作のデモンストレーション
-
headポインタで要素が取得されると、headポインタが1増加し、バッファ サイズが1減少します。 -
要素を削除するインデックスには、次の式が使用されます。
int index_position = head_pointer % buffer_capacity;
Elem element = (Elem) array[index_position];
たとえば、循環バッファの入力配列は次のようになります。
[7, 2, 5, 3, 4]要素は、循環バッファーを使用して順番に出力されます。
7
2
5
3
4
上記のメソッドを Java で循環バッファに実装してみましょう。
package delftstack;

import java.io.*;
import java.lang.*;

class Circular_Buffer {
  // the initial capacity of the buffer
  private int buffer_capacity = 0;
  // the initial size of the buffer
  private int buffer_size = 0;
  // the head pointer
  private int head_pointer = 0;
  // the tail pointer
  private int tail_pointer = -1;
  // the array
  private Object[] demo_array;

  Circular_Buffer(int array_capacity) {
    // initialize the array capacity in the constructor
    this.buffer_capacity = array_capacity;

    // initialize the array
    demo_array = new Object[array_capacity];
  }

  // insertion
  public void Insert(Object array_element) throws Exception {
    // calculate the index to insert the element
    int index = (tail_pointer + 1) % buffer_capacity;

    // increment in the size of the array
    buffer_size++;

    if (buffer_size == buffer_capacity) {
      throw new Exception("Buffer is Overflowen");
    }

    // store the element in the array
    demo_array[index] = array_element;

    // increment the tail pointer
    tail_pointer++;
  }

  // deletion
  public Object Delete() throws Exception {
    // check if the array is empty
    if (buffer_size == 0) {
      throw new Exception("Buffer is empty");
    }

    // calculate the index of the element which is going to be deleted
    int element_index = head_pointer % buffer_capacity;

    // get the element
    Object array_element = demo_array[element_index];

    // increment the head pointer
    head_pointer++;

    // decrement the size of the array
    buffer_size--;

    // return the first element
    return array_element;
  }

  // retrieve the first element
  public Object Retrieve() throws Exception {
    // check if the array is empty
    if (buffer_size == 0) {
      throw new Exception("Buffer is empty");
    }

    // calculate the index of the element to be deleted
    int element_index = head_pointer % buffer_capacity;

    Object array_element = demo_array[element_index];

    return array_element;
  }

  // helper methods
  public boolean isEmpty() {
    return buffer_size == 0;
  }
  public int size() {
    return buffer_size;
  }
}

public class Example {
  public static void main(String[] args) throws Exception {
    // create the Circular Buffer using an array
    Circular_Buffer Array_CircularBuffer = new Circular_Buffer(10);

    // insert elements into the circular buffer
    Array_CircularBuffer.Insert(7);
    Array_CircularBuffer.Insert(2);
    Array_CircularBuffer.Insert(5);
    Array_CircularBuffer.Insert(3);
    Array_CircularBuffer.Insert(4);

    // print the elements with the delete method
    System.out.println("The elements were inserted and "
        + "now printed in the order by deletion:-");
    System.out.println(Array_CircularBuffer.Delete());
    System.out.println(Array_CircularBuffer.Delete());
    System.out.println(Array_CircularBuffer.Delete());
    System.out.println(Array_CircularBuffer.Delete());
    System.out.println(Array_CircularBuffer.Delete());
  }
}
上記のコードには 2つのクラスが含まれています。1つはメソッド用で、もう 1つはオペレーションを実行するメイン クラス用です。
最初のクラスには、要素の挿入、削除、および取得のためのメソッドが含まれます。 コードは、循環バッファーの挿入および削除操作を適用して、要素を 1つずつ出力します。 出力を参照してください。
The elements were inserted and now printed in the order by deletion:-
7
2
5
3
4
リンク リストを使用して Java で循環バッファを作成する
Java でリンク リストを使用して循環バッファを作成するには、汎用ノードの作成に使用するヘルパー クラスを作成する必要があります。 配列と同様に、挿入と削除のために head と tail を維持します。 プロセスは次の図に示されています。
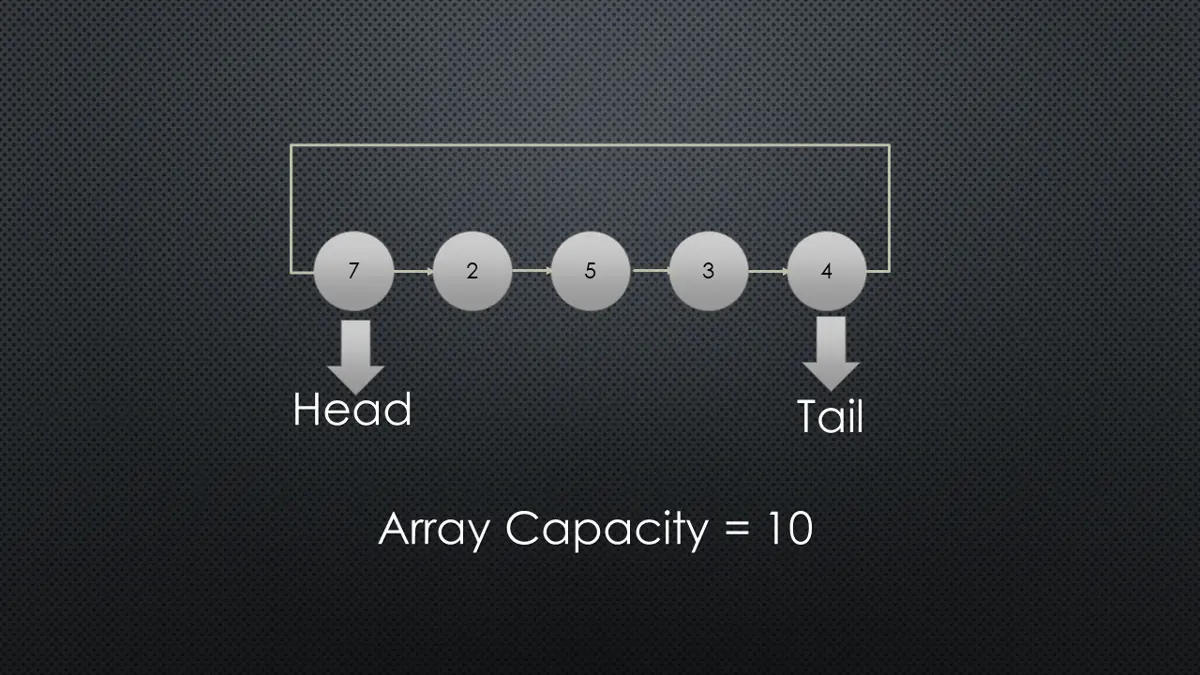
挿入操作のデモンストレーション
リンク リストを使用して循環バッファを作成するための挿入手順は次のとおりです。
- 最初は、サイズは
0で、headとtailはnullです。 - 次に、リンクされたリストの
tailに要素が追加されます。 tailの参照はheadポインターに変更されます。- リンク リストに要素が追加されると、バッファ サイズも増加します。
- 配列のサイズがその容量と等しくなると、それ以上要素を追加できなくなります。
削除操作のデモンストレーション
削除の手順は次のとおりです。
-
まず、
headポインターの要素を取得します。 -
次に、
headポインタの参照を次の要素に変更します。 -
バッファのサイズは
1減ります。たとえば、リンク リストを使用した循環バッファーの入力配列は次のようになります。
[7, 2, 5, 3, 4]要素は、リンクされたリストを持つ循環バッファーを使用して順番に出力されます。
7
2
5
3
4
Java コードでリンク リストを使用して循環バッファを実装してみましょう。
package delftstack;

class Node<Elem> {
  // the data which will be stored in the linked list
  Elem Node_Data;
  // pointer to the next node
  Node<Elem> next_pointer;

  // the constructor will initialize the data in each node
  Node(Elem Node_data) {
    this.Node_Data = Node_data;
  }
}

class LinkedList_CircularBuffer<Elem> {
  // the head node
  Node<Elem> head_element;

  // the tail node
  Node<Elem> tail_element;
  int list_size = 0;
  int list_capacity = 0;

  // the constructor for circular buffer class
  LinkedList_CircularBuffer(int list_capacity) {
    this.list_capacity = list_capacity;
  }

  // insertion
  public void Insert(Elem element) throws Exception {
    // increment in the size when elements
    // are added to the linked list
    list_size++;

    // check the buffer
    if (list_size == list_capacity) {
      throw new Exception("Buffer is Overflowen");
    }

    if (head_element == null) {
      head_element = new Node<>(element);
      tail_element = head_element;
      return;
    }

    // The node element which will be linked
    Node<Elem> temp_element = new Node<>(element);

    // reference the last element to the head node
    temp_element.next_pointer = head_element;

    // update the tail reference to the latest node.
    tail_element.next_pointer = temp_element;

    // update the tail to the latest node, which is added now
    tail_element = temp_element;
  }

  // deletion
  public Elem Delete() throws Exception {
    // check the buffer
    if (list_size == 0) {
      throw new Exception("The Buffer is empty");
    }
    // get the element
    Elem element = head_element.Node_Data;

    // update the head pointer
    head_element = head_element.next_pointer;

    // update the tail reference to the head pointer
    tail_element.next_pointer = head_element;

    // decrement in the size
    list_size--;
    if (list_size == 0) {
      // remove any references present when the buffer is null
      head_element = tail_element = null;
    }
    return element;
  }

  // retrieve the head element without deleting it
  public Elem Retrieve() throws Exception {
    // check the buffer
    if (list_size == 0) {
      throw new Exception("Empty Buffer");
    }
    // get the element
    Elem element = head_element.Node_Data;
    return element;
  }

  // helper methods
  public boolean isEmpty() {
    return list_size == 0;
  }
  public int size() {
    return list_size;
  }
}

public class Example {
  public static void main(String[] args) throws Exception {
    // create the Circular Buffer using Linked List
    LinkedList_CircularBuffer<Integer> LL_CircularBuffer = new LinkedList_CircularBuffer<>(10);

    // insert elements to the circular Buffer
    LL_CircularBuffer.Insert(7);
    LL_CircularBuffer.Insert(2);
    LL_CircularBuffer.Insert(5);
    LL_CircularBuffer.Insert(3);
    LL_CircularBuffer.Insert(4);

    // printing the elements with the method delete
    System.out.println("The elements were inserted and "
        + "now printed in the order by deletion:-");
    System.out.println(LL_CircularBuffer.Delete());
    System.out.println(LL_CircularBuffer.Delete());
    System.out.println(LL_CircularBuffer.Delete());
    System.out.println(LL_CircularBuffer.Delete());
    System.out.println(LL_CircularBuffer.Delete());
  }
}
上記のコードは、リンクされたリスト操作を実行するための一般的な node クラスを作成し、挿入、削除、および取得操作を実行するためのメソッドを作成します。
このコードは、リンクされたリストを使用して循環バッファーを作成し、入力リスト要素を 1つずつ出力します。以下の出力を参照してください。
The elements were inserted and now printed in the order by deletion:-
7
2
5
3
4