Angular で子を表示
@ViewChild は、最も一般的に使用される Angular のデコレータです。これは、Angular を学習しているときに遭遇した最初のデコレーターの 1つです。
@ViewChild には、このチュートリアルで説明する多くの機能があり、各ユースケースの実用的な例があります。
@ViewChild は、ビュークエリを構成するプロパティデコレータです。ビューDOM が変更され、新しい子がセレクターと一致すると、プロパティが更新されます。
ディレクティブ、DOM 要素、および子コンポーネントで@ViewChild を使用できます。例では、@ViewChild を使用する方法を理解できます。
次のコマンドを使用して、新しいアプリケーションを作成しましょう。
# angular
ng new my-app
新しいアプリケーションを Angular で作成した後、このコマンドを使用してアプリケーションディレクトリに移動します。
# angular
cd my-app
それでは、アプリを実行して、すべての依存関係が正しくインストールされているかどうかを確認しましょう。
# angular
ng serve --open
ディレクティブ LanguageDirective を作成しましょう。このディレクティブは、属性 appLanguage を持つ要素を検索し、要素内のテキストの前に Language という単語を追加します。
@angular/cli を使用してディレクティブを生成する方法と、ファイル language.directive.ts を作成する方法は 2つあります。
# Angular
ng generate directive language --skip-tests
このコマンドは、language.directive.ts ファイルを作成し、ディレクティブを app.module.ts ファイルに追加します。そして、ElementRef と Renderer2 を使用してテキストを書き直します。
したがって、language.directive.ts のコードは次のようになります。
# angular
import {
  Directive,
  ElementRef,
  Renderer2
} from '@angular/core';

@Directive(
  { selector: '[appLanguage]' }
)
export class LanguageDirective {
  language = 'NodeJs';

  constructor(elem: ElementRef, renderer: Renderer2) {
    let language = renderer.createText('Language ');
    renderer.appendChild(elem.nativeElement, language);
  }
}
また、app.module.ts のコードは次のようになります。
# Angular
import { NgModule } from '@angular/core';
import { BrowserModule } from '@angular/platform-browser';
import { FormsModule } from '@angular/forms';
import { AppComponent } from './app.component';
import { HelloComponent } from './hello.component';
import { LanguageDirective } from './language.directive';

@NgModule({
  imports: [BrowserModule, FormsModule],
  declarations: [AppComponent, HelloComponent, LanguageDirective],
  bootstrap: [AppComponent],
})
export class AppModule {}
コンポーネントテンプレートのテキストを含む li に appLanguage 属性を追加します。したがって、app.component.html のコードは次のようになります。
# Angular
<h2>Programming Languages</h2>
<ul>
  <li appLanguage>Angular</li>
  <li appLanguage>React</li>
  <li appLanguage>React Native</li>
</ul>
出力:
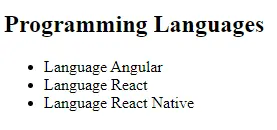
要素のコンテンツの前にある Language という単語は、LanguageDirective のインスタンス変数にアクセスし、その値で extraLanguage インスタンス変数を設定することもできます。
したがって、app.component.ts のコードは次のようになります。
# Angular
import { Component, ViewChild, AfterViewInit } from '@angular/core';
import { LanguageDirective } from './language.directive';
@Component({
selector: 'my-app',
templateUrl: './app.component.html',
styleUrls: ['./app.component.css'],
})
export class AppComponent implements AfterViewInit {
extraLanguage!: string;
@ViewChild(LanguageDirective)
set appLanguage(directive: LanguageDirective) {
this.extraLanguage = directive.language;
}
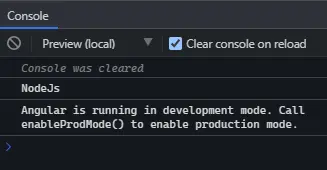
ngAfterViewInit() {
console.log(this.extraLanguage); // NodeJs
}
}
上記のコードでセッターを使用して、extraLanguage 変数を設定しました。
これで、最初のビューがロードされた後に子コンポーネントとディレクティブが使用可能になるため、AfterViewInit ライフサイクルフックが変数にアクセスするのを待つことに気付くでしょう。
出力:
上記の出力は、親コンポーネントが@ViewChild を使用してディレクティブから値にアクセスできることを示しています。
Angular の DOM 要素で ViewChild を使用する
この例では、DOM 要素を調べ、@ViewChild を使用してそれらにアクセスします。 @ViewChild を使用すると、テンプレート参照変数を使用してネイティブ DOM 要素にアクセスできます。
次のコマンドを使用して、新しいアプリケーションを作成しましょう。
# angular
ng new my-app
新しいアプリケーションを Angular で作成した後、このコマンドを使用してアプリケーションディレクトリに移動します。
# angular
cd my-app
それでは、アプリを実行して、すべての依存関係が正しくインストールされているかどうかを確認しましょう。
# angular
ng serve --open
たとえば、app.component.html に入力タグがあり、以下のコードに示す #forViewChild 参照変数があります。
# Angular
<input #forViewChild placeholder="Your favorite Programming Language">
また、app.component.css に CSS を追加します。
# Angular
p {
  font-family: Lato;
}
input {
  padding: 5px 10px;
}
label {
  font-size: 20px;
  padding-right: 10px;
}
出力:

これで、@ViewChild を使用して入力にアクセスし、値を設定できます。app.component.ts のコードは次のようになります。
# angular
import { Component, ViewChild, AfterViewInit, ElementRef } from '@angular/core';

@Component({
  selector: 'my-app',
  templateUrl: './app.component.html',
  styleUrls: ['./app.component.css'],
})
export class AppComponent implements AfterViewInit {
  @ViewChild('forViewChild') forViewChild!: ElementRef;
  ngAfterViewInit() {
    this.forViewChild.nativeElement.value = 'Angular!';
  }
}
したがって、ngAfterViewInit が実行されると、入力値が変更され、Angular!に設定されます。以下の例に示すように。
出力:

上記の例でわかるように、親コンポーネントは@ViewChild を使用して子 DOM 要素の値を設定します。
Angular の子コンポーネントで ViewChild を使用する
@ViewChild を使用すると、子コンポーネントにアクセスして、子が使用できるメソッドまたはインスタンス変数を呼び出すことができます。次に、Angular の子コンポーネントで@ViewChild を使用する方法を理解するための例を見ていきます。
次のコマンドを使用して、新しいアプリケーションを作成しましょう。
# angular
ng new my-app
新しいアプリケーションを Angular で作成した後、このコマンドを使用してアプリケーションディレクトリに移動します。
# angular
cd my-app
それでは、アプリを実行して、すべての依存関係が正しくインストールされているかどうかを確認しましょう。
# angular
ng serve --open
それでは、HelloComponent として新しいコンポーネントを作成しましょう。
新しいコンポーネントは 2つの方法で作成できます。 @angular/cli を使用して、次のコマンドを実行します。
# Angular
ng generate component hello --flat --skip-tests
このコマンドを使用すると、hello.component.ts、hello.component.html、および hello.component.css ファイルが作成されます。または、これらのファイルを手動で作成することもできます。
ここで、app.module.ts に、新しく作成したコンポーネントを追加する必要があります。app.module.ts のコードは次のようになります。
# Angular
import { NgModule } from '@angular/core';
import { BrowserModule } from '@angular/platform-browser';
import { FormsModule } from '@angular/forms';

import { AppComponent } from './app.component';
import { HelloComponent } from './hello.component';

@NgModule({
  imports:      [ BrowserModule, FormsModule ],
  declarations: [ AppComponent, HelloComponent ],
  bootstrap:    [ AppComponent ]
})
export class AppModule { }
メッセージを返すために、GreetingMessage メソッドを HelloComponent に追加します。
# Angular
import { Component, OnInit } from '@angular/core';

@Component({
  selector: 'hello',
  templateUrl: './hello.component.html',
  styleUrls: ['./hello.component.css'],
})
export class HelloComponent implements OnInit {
  constructor() {}

  GreetingMessage() {
    return 'Hello Member!';
  }

  ngOnInit(): void {}
}
ここで、<hello> を使用して app.component.html の子コンポーネントを参照します。したがって、コードは次のようになります。
# Angular
<hello>It Works</hello>
親コンポーネントクラス app.component.ts から@ViewChild を使用して GreetingMessage メソッドを呼び出します。したがって、コードは次のようになります。
# Angular
import { Component, ViewChild, AfterViewInit } from '@angular/core';
import { HelloComponent } from './hello.component';

@Component({
  selector: 'my-app',
  templateUrl: './app.component.html',
  styleUrls: ['./app.component.css'],
})
export class AppComponent {
  @ViewChild(HelloComponent) hello!: HelloComponent;

  ngAfterViewInit() {
    console.log(this.hello.GreetingMessage());
  }
}
出力:
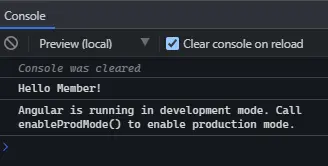
このチュートリアルでは、さまざまな状況で@ViewChild を使用する方法を例を挙げて説明しました。

Rana is a computer science graduate passionate about helping people to build and diagnose scalable web application problems and problems developers face across the full-stack.
LinkedIn