Angular Subscribe()メソッド
Angular の subscribe() メソッドを紹介し、アプリケーションで使用します。
Angular Subscribe
Subscribe() は、observer を observable イベントに接続する Angular のメソッドです。これらのオブザーバブルに変更が加えられるたびに、コードが実行され、サブスクライブメソッドを使用して結果または変更が監視されます。Subscribe() は、Angular によって内部的に使用される rxjs ライブラリのメソッドです。
ニュースレターは現在、ウェブサイトの最も一般的な部分です。それらを観測可能なイベントとして、そして私たちをオブザーバーとして想像してみましょう。いずれかの Web サイトでニュースレターフォームに電子メールを入力すると、監視可能なイベントにサブスクライブします。そのウェブサイトから新しいニュースレターがリリースされるたびに、そのイベントの購読を解除するまで、メールでそれを受け取ります。
同様に、Angular アプリケーションで監視したい関数がある場合は、その関数をサブスクライブします。その関数に変更が加えられると、subscribe() メソッドを使用して変更を確認できます。
Subscribe() は、パラメータとして 3つのメソッド、next、error、および complete を取ります。
nextメソッドを使用して、オブザーバブルによって放出されたすべての値を渡すことができます。errorメソッドを使用して、ストリームのどこかで発生したエラーを渡すことができます。completeメソッドを使用すると、監視可能なイベント全体が完了したら、値を渡すことができます。
subscribe() を詳しく理解するために例を見てみましょう。まず、新しいサービスファイルを subscribe.service.ts として作成します。このファイルで、next メソッドを使用してオブザーバーに値を渡す assignValue() 関数を作成します。
subsribe.service.ts のコードは次のようになります。
# angular
import { Injectable } from '@angular/core';
import { Observable } from 'rxjs';

@Injectable({
  providedIn: 'root',
})
export class SubscribeService {
  assignValue() {
    const SubscribeObservable = new Observable((observer) => {
      observer.next('Angular');
    });
    return SubscribeObservable;
  }
}
次に、このサービスを app.module.ts にインポートし、@NgModule 内でプロバイダーとして定義します。
# angular
import { NgModule } from '@angular/core';
import { BrowserModule } from '@angular/platform-browser';
import { FormsModule } from '@angular/forms';

import { AppComponent } from './app.component';
import { HelloComponent } from './hello.component';
import { SubscribeService } from './subscribe.service';

@NgModule({
  imports: [BrowserModule, FormsModule],
  declarations: [AppComponent, HelloComponent],
  bootstrap: [AppComponent],
  providers: [SubscribeService],
})
export class AppModule {}
app.component.ts ファイル内の次のステップでは、サービスのコンストラクターと、オブザーバーから値を取得する関数を作成します。また、app.component.ts ファイルにサービスをインポートすることを忘れないでください。
# angular
import { Component, VERSION } from '@angular/core';
import { SubscribeService } from './subscribe.service';

@Component({
  selector: 'my-app',
  templateUrl: './app.component.html',
  styleUrls: ['./app.component.css'],
})
export class AppComponent {
  name = 'Angular ' + VERSION.major;

  constructor(private SubscribeService: SubscribeService) {}

  ngClick() {
    this.SubscribeService.assignValue().subscribe((result) => {
      console.log(result);
    });
  }
}
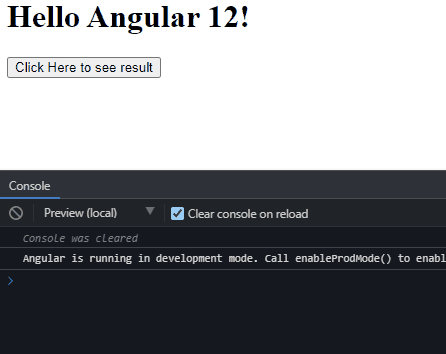
次に、app.component.html にテンプレートを作成します。
# angular
<hello name="{{ name }}"></hello>
<button (click)="ngClick()">Click Here to see result</button>
出力:

Rana is a computer science graduate passionate about helping people to build and diagnose scalable web application problems and problems developers face across the full-stack.
LinkedIn