Angular で ngClass を使用して条件付きクラスを追加する

条件付きクラスを追加する方法、または if-else 条件を使用して、Angular アプリケーションで ngClass を使用して動的クラスを表示する方法を紹介します。
Angular で ngClass を使用して条件付きクラスを追加する
クラスは、アプリケーションの UI の設計と作成の中心的な部分です。アプリケーションのさまざまな部分に割り当てられたクラスに基づいて設計を作成します。
場合によっては、動的クラスを追加したり、条件に基づいてクラスを変更したりする必要があります。
このチュートリアルでは、Angular の ngClass 内で if-else ステートメントを実現するためのさまざまな方法について説明します。
次のコマンドを使用して、新しいアプリケーションを作成しましょう。
# angular
ng new my-app
Angular で新しいアプリケーションを作成したら、このコマンドを使用してアプリケーションディレクトリに移動します。
# angular
cd my-app
それでは、アプリを実行して、すべての依存関係が正しくインストールされているかどうかを確認しましょう。
# angular
ng serve --open
条件メッセージが以下の app.component.ts に示すように設定されている場合、HTML 要素にクラスを追加しようとする簡単な例から始めましょう。
# angular
import { Component, VERSION } from '@angular/core';

@Component({
    selector: 'my-app',
    templateUrl: './app.component.html',
    styleUrls: [ './app.component.css' ]
})
export class AppComponent  {
    message = 'warning';
}
次に、app.component.html の変数メッセージを使用して、条件付きの ngClass を持つ HTML 要素を追加しましょう。
# angular
<div [ngClass]="{'warning': message}">
Hello this is a warning message
</div>
次に、以下の条件に基づいて、div に追加するクラスに CSS コードを追加しましょう。
# angular
.warning {
    font-family: Lato;
    background: red;
    color: white;
    padding: 10px;
}
出力:

例からわかるように、ngClass 内で if ステートメントを使用するのは簡単です。条件に基づいてクラスを簡単に追加しました。
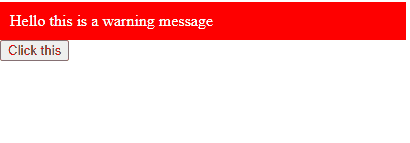
次に、真の条件に基づいてクラスを追加する例を見ていきます。条件が false の場合、異なるクラスを追加します。
したがって、最初に、app.component.html に条件を追加し、以下に示すように、条件を変更するクリックイベントを含むボタンを追加します。
# angular
<div [ngClass]="Warnmessage ? 'warning' : 'info'">
    Hello this is a warning message
</div>
<button (click)=changeClass()>Click this</button>
次に、変数 Warnmessage と、ボタンをクリックしたときに条件を変更する関数を作成しましょう。app.component.ts のコードは次のスニペットのようになります。
# angular
import { Component, VERSION } from '@angular/core';

@Component({
    selector: 'my-app',
    templateUrl: './app.component.html',
    styleUrls: ['./app.component.css'],
})
export class AppComponent {
    name = 'Angular ' + VERSION.major;
    Warnmessage = true;

    changeClass() {
        this.Warnmessage = false;
        console.log('Button Clicked');
    }
}
このコードを実行して、どのように機能するかを確認してみましょう。
出力:
ご覧のとおり、ngClass 内でも if-else ステートメントを使用しており、条件で機能します。ただし、単一の条件に基づいて複数のクラスを追加する場合は、スペースを追加し、その後に新しいクラス名を書き込むことによっても実行できます。
# angular
<div [ngClass]="Warnmessage ? 'warning message-box' : 'info message-box'">
    Hello this is a warning message
</div>
<button (click)=changeClass()>Click this</button>
また、最初のクラス名の後にスペースを追加し、2 番目のクラス名を書き込むことで、複数のクラスを追加することもできます。トリプルクラスまたは必要な数だけ追加することもできます。

Rana is a computer science graduate passionate about helping people to build and diagnose scalable web application problems and problems developers face across the full-stack.
LinkedIn