HOWTO · JavaScript
在 JavaScript 中模拟按键
本教程帮助你使用 JavaScript 以编程方式模拟按键。
本页内容
Web 应用程序经常需要对键盘输入做出反应,而测试这种行为通常意味着要手动按下按键。JavaScript 可以改为创建一个合成的 KeyboardEvent 并将其传递给元素,这样脚本就能触发与真实按键相同的监听器。本文介绍如何构造和派发这些事件、监听器如何观察它们,以及这种模拟在哪些方面达不到真实用户输入的效果。
合成键盘事件的工作原理
当用户按下按键时,浏览器会生成一系列受信任的事件:键按下时触发 keydown,对产生字符的键触发 keypress(现已弃用),键松开时触发 keyup。脚本无法重现这种物理输入,但可以构造一个等价的事件对象,并让它走相同的派发路径。
实现这一点依赖两个部分:
KeyboardEvent构造函数构建一个事件,其属性描述这次按键:key保存字符值,例如"a"或"Enter";code标识物理按键,例如"KeyA";ctrlKey、shiftKey、altKey和metaKey这些标志描述被按住的修饰键。dispatchEvent将事件传递到目标元素。监听器会立即运行——派发是同步的——而当事件以bubbles: true创建时,它还会沿祖先节点继续向上冒泡到document和window。
作为对比,下图展示了真实按下 a 键所产生的 keypress 事件在浏览器控制台中展开的样子:isTrusted 为 true,key、code、charCode、keyCode 和 which 保存的值与脚本通过 init 对象所赋的值相同。
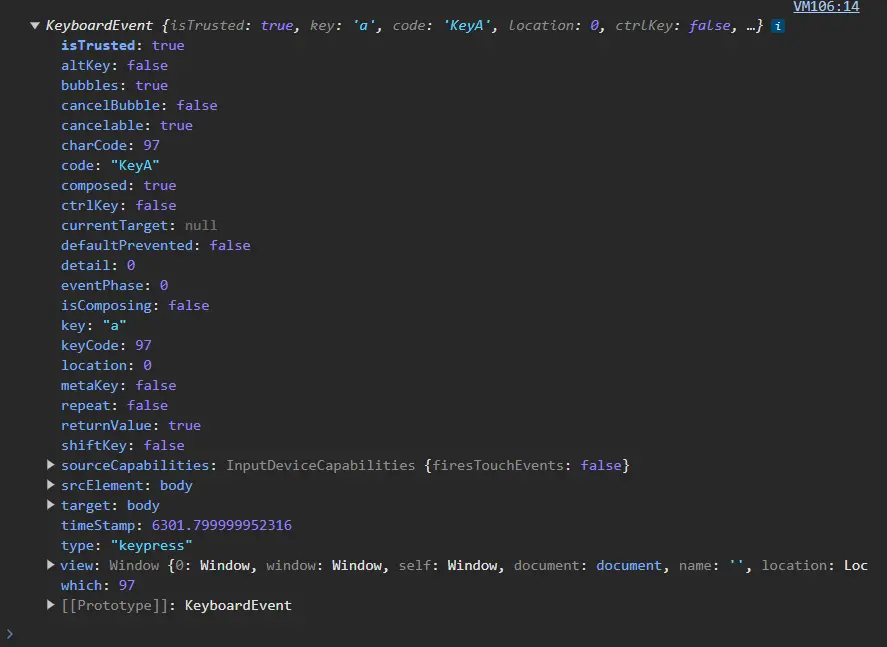
相比之下,以这种方式派发的每个事件,其 isTrusted 均为 false,这正是它与真实用户输入的区别。最后一节将解释这一差异在实践中的意义。
创建并派发一个 KeyboardEvent
构造函数接受一个事件类型和一个可选的初始化对象:new KeyboardEvent(type, init)。类型使用 "keydown" 或 "keyup";keypress 出于兼容性仍然存在,但已被弃用,因此新的监听器应绑定到 keydown。init 对象用于设置监听器将读取的属性。
构造完成后,通过 target.dispatchEvent(event) 发送事件。请先注册监听器再派发——事后添加的监听器永远看不到已经派发完毕的事件。
在页面上,监听器通常绑定在 window 或某个元素上,而事件在 document.body 上派发;设置 bubbles: true 后,事件会沿祖先链向上冒泡,因此 window 上的监听器依然会触发:
本节中的代码以及显示的标签或输出仍为英文。
<!DOCTYPE html>
<html>
<body>
<script>
    // Register the listener first; dispatchEvent runs listeners synchronously.
    window.addEventListener("keydown", function (event) {
        if (event.key === "a") {
            console.log(event);
        }
    });

    // Build a synthetic keydown event for the "a" key.
    const keyEvent = new KeyboardEvent("keydown", {
        key: "a",        // value a listener reads as event.key
        code: "KeyA",    // physical key position
        keyCode: 97,     // deprecated; only for legacy listeners
        charCode: 97,    // deprecated; only for legacy listeners
        bubbles: true,
        cancelable: true
    });

    // Deliver the event; the window listener receives it as it bubbles up.
    document.body.dispatchEvent(keyEvent);
</script>
</body>
</html>
由于 bubbles 设置为 true,尽管事件是在 document.body 上派发的,绑定在 window 上的监听器依然会触发。监听器会记录整个 KeyboardEvent 对象;在控制台中展开它可以看到 type: "keydown"、isTrusted: false、key: "a"、code: "KeyA",以及遗留的 charCode 和 keyCode 值 97。
同样的构造与派发模式也可以在浏览器之外运行,这对于快速检查监听器非常方便。Node.js 没有 DOM 的 KeyboardEvent,因此下面的脚本仅在没有现成实现时才定义一个等价类——在真实页面中则由内置类接管——并在一个普通的 EventTarget 上派发;EventTarget 暴露了与 DOM 元素相同的 addEventListener/dispatchEvent 接口。
运行此示例:
// The DOM defines KeyboardEvent; Node does not, so this stand-in supplies
// the same fields when the script runs outside a browser.
if (typeof KeyboardEvent === "undefined") {
    globalThis.KeyboardEvent = class extends Event {
        constructor(type, init = {}) {
            super(type, init);
            this.key = init.key;
            this.code = init.code;
            this.ctrlKey = Boolean(init.ctrlKey);
            this.shiftKey = Boolean(init.shiftKey);
            this.altKey = Boolean(init.altKey);
            this.metaKey = Boolean(init.metaKey);
        }
    };
}

const target = new EventTarget();   // stands in for a DOM element

// Register the listener first; dispatchEvent runs listeners synchronously.
target.addEventListener("keydown", function (event) {
    if (event.key === "a") {
        console.log(`keydown observed: key=${event.key} code=${event.code}`);
    }
});

// Build and dispatch a synthetic keydown event for the "a" key.
const keyEvent = new KeyboardEvent("keydown", {
    key: "a",        // value a listener reads as event.key
    code: "KeyA",    // physical key position
    bubbles: true,
    cancelable: true
});

target.dispatchEvent(keyEvent);
keydown observed: key=a code=KeyA
独立的 EventTarget 没有祖先节点,因此 bubbles 在这里没有可见效果;在页面上,正是这个标志把事件一路带到 document 和 window。
在输入框上处理键盘事件
一个常见任务是检查某个输入框自己的处理器是否对键盘输入做出反应。下面的页面包含一个文本输入框和一个按钮;点击按钮会创建一个 keydown 事件,并直接在该输入框上派发,因此只有绑定在该输入框上(或通过冒泡绑定在其祖先元素上)的监听器才能观察到它。
本节中的代码以及显示的标签或输出仍为英文。
<!DOCTYPE html>
<html>
<head>
    <title>Simulate Keypress Example</title>
</head>
<body>
    <input type="text" id="textInput" placeholder="Input field">
    <button id="simulateButton">Simulate Keypress</button>

    <script>
        const input = document.getElementById("textInput");

        // The input's own listener observes the dispatched event.
        input.addEventListener("keydown", function (event) {
            if (event.key === "a") {
                console.log("Keypress simulated: ", event.key);
            }
        });

        // Clicking the button creates and dispatches the event.
        document.getElementById("simulateButton").addEventListener("click", function () {
            const keyEvent = new KeyboardEvent("keydown", {
                key: "a",
                code: "KeyA",
                bubbles: true,
                cancelable: true
            });
            input.dispatchEvent(keyEvent);
        });
    </script>
</body>
</html>
保存文件,在浏览器中打开它,然后点击按钮。控制台会从输入框的监听器输出 Keypress simulated: a:
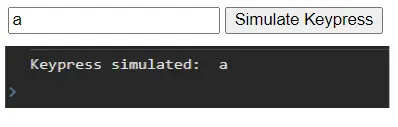
请注意,派发事件只会通知监听器——它不会把 a 放进输入框。合成的 keydown 永远不会改变 input.value;上图输入框中可见的字符是为了截图而手动输入的。如果要用脚本填充输入框,请直接给 input.value 赋值。
模拟修饰键
像 Ctrl+A 这样的组合键,其实只是一个设置了修饰键标志的 keydown。为主键设置 key 和 code,然后为每个被按住的修饰键添加一个布尔标志——ctrlKey、shiftKey、altKey 或 metaKey(metaKey 在 macOS 上是 Command 键,在其他系统上是 Windows 键)。监听器随后检查这些相同的属性。下面的脚本使用与前面示例相同的 KeyboardEvent 替身,并在一个普通的 EventTarget 上派发。
运行此示例:
本节中的代码以及显示的标签或输出仍为英文。
// Same stand-in as the first example so this script also runs where no
// DOM KeyboardEvent exists; in a browser the built-in class is used.
if (typeof KeyboardEvent === "undefined") {
    globalThis.KeyboardEvent = class extends Event {
        constructor(type, init = {}) {
            super(type, init);
            this.key = init.key;
            this.code = init.code;
            this.ctrlKey = Boolean(init.ctrlKey);
            this.shiftKey = Boolean(init.shiftKey);
            this.altKey = Boolean(init.altKey);
            this.metaKey = Boolean(init.metaKey);
        }
    };
}

const target = new EventTarget();

// Listen for the combination on keydown.
target.addEventListener("keydown", function (event) {
    if (event.ctrlKey && event.key === "a") {
        console.log("Ctrl+A keypress simulated");
    }
});

const event = new KeyboardEvent("keydown", {
    key: "a",
    code: "KeyA",
    ctrlKey: true,   // marks Ctrl as held during this event
    bubbles: true,
    cancelable: true
});

target.dispatchEvent(event);
Ctrl+A keypress simulated
在真实页面中,相同的监听器和构造代码会针对内置的 KeyboardEvent 运行;把监听器绑定到 window,或在 document.body 上派发,即可覆盖整个文档。控制台显示监听器的消息:

如果被测代码跟踪完整的按下—松开过程,请在之后派发一个对应的 keyup 事件,使序列的两半都能被观察到。
了解合成事件的局限
合成事件对测试你自己的处理器很有用,但它们不能替代真实输入:
event.isTrusted为false,因此监听器总能把派发的事件与真实按键区分开,浏览器也会对不受信任的事件保留特权行为。- 在输入框上派发
keydown或keyup永远不会改变其value、移动光标,也不会产生beforeinput/input事件——不会输入任何文本。 - 由键盘触发的浏览器行为不会对不受信任的按键事件执行:Ctrl+A 不会全选,Tab 不会移动焦点,F5 也不会重新加载页面。其他激活行为仍可能对某些合成事件生效;例如,派发的点击事件可以切换复选框或激活链接。
keypress事件类型以及keyCode/charCode/which这些数字属性已被弃用;请优先使用带key和code的keydown/keyup。
对于单元测试和解耦的应用逻辑,构造一个 KeyboardEvent 并调用 dispatchEvent 就足够了。当你需要浏览器表现得与用户真实输入完全一致时——受信任的输入、真实的焦点变化和默认行为——请改用 Playwright、Puppeteer 或 WebDriver 等自动化工具来驱动它。