React にクラス Active を追加する
React フレームワークでアプリをビルドするときに、1つの classNames だけをアクティブにするため。 classNames をアクティブにしようとすると、他の classNames がアクティブになります。
この記事では、この状況を解決する方法について説明します。
React の classNames 属性
CSS で Web ページのスタイルを設定する場合、HTML では class を参照として使用しますが、React では class という単語が別の機能のために予約されているため、使用できません。 ここで、React のクラスの代わりとして classNames が役立ちます。
classNames は、ボタン classNames の例でわかるように、特定のコンポーネントに特定の関数を作成したい場合に便利です。
緑色のボタンのグループを想像してみましょう。 これらのボタンはどれもクリックされていないときは緑色のままですが、1つのボタンがクリックされると赤色になり、アクティブであることを意味します。
このチュートリアルでは、アクティブなクラスをボタンに追加することで、残りのボタンを青くせずにクリックしたボタンを青くする方法について説明します。
React のボタン classNames に Active を追加する
新しい Web プロジェクト npx create-react-app examplefour を作成することから始めます。 次に、app.js に移動して、次のコードを配置します。
コード - App.js:
import React, { useState } from "react";
import styled from "styled-components";

const theme = {
  blue: {
    default: "#3f51b5",
    hover: "#283593"
  },
  pink: {
    default: "#e91e63",
    hover: "#ad1457"
  }
};

const Button = styled.button`
  background-color: ${(props) => theme[props.theme].default};
  color: white;
  padding: 5px 15px;
  border-radius: 5px;
  outline: 0;
  text-transform: uppercase;
  margin: 10px 0px;
  cursor: pointer;
  box-shadow: 0px 2px 2px lightgray;
  transition: ease background-color 250ms;
  &:hover {
    background-color: ${(props) => theme[props.theme].hover};
  }
  &:disabled {
    cursor: default;
    opacity: 0.7;
  }
`;

Button.defaultProps = {
  theme: "blue"
};

function clickMe() {
  alert("You clicked me!");
}

const ButtonToggle = styled(Button)`
  opacity: 0.7;
  ${({ active }) =>
    active &&
    `
    opacity: 1;
  `}
`;

const Tab = styled.button`
  padding: 10px 30px;
  cursor: pointer;
  opacity: 0.6;
  background: white;
  border: 0;
  outline: 0;
  border-bottom: 2px solid transparent;
  transition: ease border-bottom 250ms;
  ${({ active }) =>
    active &&
    `
    border-bottom: 2px solid black;
    opacity: 1;
  `}
`;
const types = ["Cash", "Credit Card", "Bitcoin"];

function ToggleGroup() {
  const [active, setActive] = useState(types[0]);
  return (
    <div>
      {types.map((type) => (
        <ButtonToggle active={active === type} onClick={() => setActive(type)}>
          {type}
        </ButtonToggle>
      ))}
    </div>
  );
}

export default function App() {
  return (
    <>
      <ToggleGroup />
    </>
  );
ToggleGroup および ButtonToggle 関数と呼ばれる React フックを使用して、クリックされたときにどのボタンがアクティブであるかを追跡します。 次に、onClick イベント リスナー関数がアクティブに設定されている状態で、ボタンの 1つがクリックされると、そのボタンに関連付けられている classNames だけがアクティブになります。
次に、クリックされたボタンと非アクティブなボタンを区別するためのスタイルを追加しました。 次に、次のスニペットのように、index.js で少しコーディングを行います。
コード - index.js:
import React from "react";
import ReactDOM from "react-dom";

import App from "./App";

const rootElement = document.getElementById("root");
ReactDOM.render(<App />, rootElement);
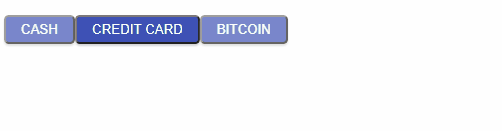
出力:
まとめ
ユーザーが残りのボタンから 1つのボタンをアクティブにしようとすると、非常に頑固な作業になる可能性があります。 onClick イベント リスナーと一緒に ToggleGroup 関数を適用することは、状況を乗り越える 1つのスムーズな方法です。

Fisayo is a tech expert and enthusiast who loves to solve problems, seek new challenges and aim to spread the knowledge of what she has learned across the globe.
LinkedIn