React Native 中的 zIndex

我们将介绍一个如何在 React Native 应用程序中使用 zIndex 的示例。
在 React Native 中使用 zIndex 指定元素的堆栈顺序
zIndex 用于指定 React 本机应用程序中元素的堆栈顺序。
通过赋予它们较高的 zIndex 值,可以将元素放置在其他元素的前面。如果我们想在 2 个元素之间显示一个元素,我们可以分配一个更大的 zIndex 值。
这将位于元素的顶部和一个低 zIndex 值。它需要显示在中间和最低值。
它将显示在两个元素的下方。zIndex 有一些规则。它仅适用于定位为绝对、粘性、固定或相对的元素。
让我们看一个有 3 张卡片的例子,并尝试用不同的 zIndex 值定位它们。因此,让我们使用 expo cli 创建一个新的 React Native 应用程序。
我们将使用 npm 命令安装 expo-cli。
# react native
npm install -g expo-cli
如果你使用 yarn 而不是 npm,你可以使用以下命令。
# react native
yarn global add expo-cli
现在我们将使用 expo 命令创建一个新的 React Native 项目。
# react native
expo init MyApp
此命令将创建一个新项目 MyApp。npm 和 yarn 用户使用相同的命令。
我们将进入我们的项目目录并使用 npm 命令启动应用程序。
# react native
cd MyApp
npm start
如果你使用的是 yarn。
# react native
cd MyApp
yarn start
我们也可以通过运行 expo 命令来启动我们的应用程序。
# react native
cd MyApp
expo start
现在,在我们的 App.js 中,我们将导入 Text、View、Stylesheet。我们还将导入常量和卡片。
# react native
import * as React from 'react';
import { Text, View, StyleSheet } from 'react-native';
import Constants from 'expo-constants';
import { Card } from 'react-native-paper';
在 return 中,我们将创建包含 3 张卡片的视图。
# react native
export default function App() {
  return (
    <View style={styles.container}>
      <Text style={styles.paragraph}>
        Z Index Example
      </Text>
      <Card style={styles.card}>
        <Text style={styles.paragraph}>
        This is a card
        </Text>
      </Card>
      <Card style={styles.card2}>
        <Text style={styles.paragraph}>
        This is a card
        </Text>
      </Card>
      <Card style={styles.card3}>
        <Text style={styles.paragraph}>
        This is a card
        </Text>
      </Card>
    </View>
  );
}
我们将设计我们的卡片重叠但不完全相互覆盖。我们将需要分配负边距以获得我们想要的结果。
所以我们的代码如下所示。
# react native
const styles = StyleSheet.create({
  container: {
    flex: 1,
    justifyContent: 'center',
    paddingTop: Constants.statusBarHeight,
    backgroundColor: '#ecf0f1',
    padding: 8,
  },
  paragraph: {
    margin: 24,
    fontSize: 18,
    fontWeight: 'bold',
    textAlign: 'center',

  },
  card: {
    margin: 24,
    marginBottom: 0,
    height: 240,
  },
  card2: {
    margin: 24,
    marginBottom: 0,
    height: 200,
    width: 140,
    marginTop: -150,
    backgroundColor: '#900',
  },
  card3: {
    margin: 24,
    marginBottom: 12,
    height: 100,
    marginTop: -100,
    backgroundColor: '#6ED4C8',
  },
});
输出:
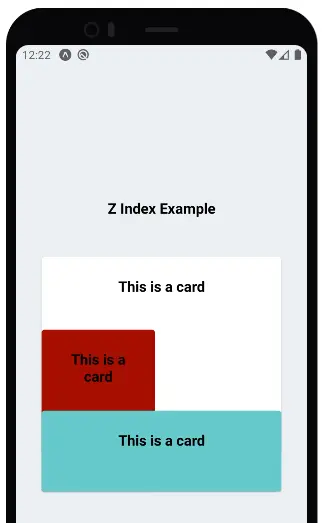
所以,正如你在上面的例子中看到的,通过改变三张卡片的宽度和高度,我们可以让它们相互重叠。
让我们玩一下 zIndex,使用 zIndex 在屏幕上放置元素。因此,我们首先将 zIndex:1 值分配给白卡。
# react native
card: {
    margin: 24,
    marginBottom: 0,
    height: 240,
    zIndex: 1
  },
输出:
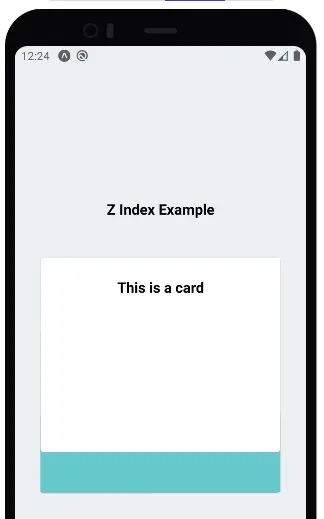
因此,如果我们将 1 的 zIndex 分配给白卡,它会显示在所有元素的顶部。因为白卡的高度很小,所以只显示了一小部分蓝色。
仅分配 1 的值会使白卡具有较高的 z 索引值,因为其余的 2 卡还没有任何价值。因此,白卡显示在顶部。
现在,让我们更改棕色卡片的 z 索引值并将其设置为 2。
# react native
card2: {
    margin: 24,
    marginBottom: 0,
    height: 200,
    width: 140,
    marginTop: -150,
    backgroundColor: '#900',
    zIndex: 2
  },
输出:
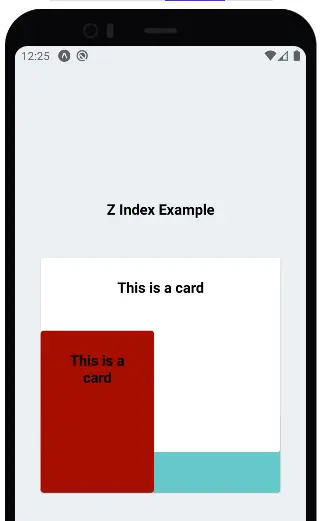
正如你在上面的结果中看到的那样,棕色卡片出现在白色和蓝色卡片的顶部,因为它具有更大的 zIndex 值。
现在,让我们将值 3 分配给蓝卡。
# react native
card3: {
    margin: 24,
    marginBottom: 12,
    height: 100,
    marginTop: -100,
    backgroundColor: '#6ED4C8',
    zIndex: 3
  },
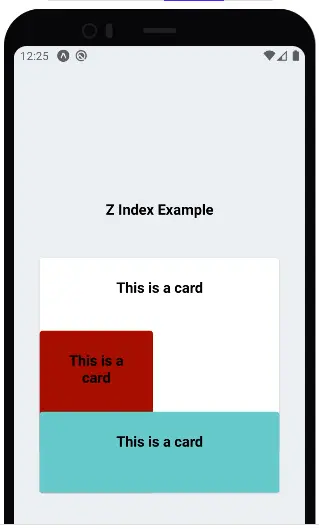
输出:
结论
现在,你可以在上面的结果中看到,如果我们根据它们的编码顺序将 zIndex 赋予所有元素。他们会默认显示结构。
但是如果你想让任何元素出现在其他元素之上,我们可以让那个元素的 zIndex 高于我们想要它在上面的元素。
因此,通过遵循这些简单的规则,我们可以轻松地将 zIndex 用作移动应用程序的优势,并创建令人惊叹的 UI 和动画。

Rana is a computer science graduate passionate about helping people to build and diagnose scalable web application problems and problems developers face across the full-stack.
LinkedIn