PyQt5 Tutorial - BoxLayout
We’re going to introduce the QBox layout like a horizontal box layout, a vertical box layout and the stretch widgets.
Vertical Box Layout - QVBoxLayout
import sys
from PyQt5 import QtWidgets
def basicWindow():
app = QtWidgets.QApplication(sys.argv)
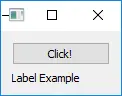
windowExample = QtWidgets.QWidget()
buttonA = QtWidgets.QPushButton("Click!")
labelA = QtWidgets.QLabel("Label Example")
v_box = QtWidgets.QVBoxLayout()
v_box.addWidget(buttonA)
v_box.addWidget(labelA)
windowExample.setLayout(v_box)
windowExample.setWindowTitle("PyQt5 Lesson 4")
windowExample.show()
sys.exit(app.exec_())
basicWindow()
Where,
b = QtWidgets.QPushButton("Click!")
l = QtWidgets.QLabel("Label Example")
The QPushButton and QLabel are not added to the window the same as what we did in last chapters. These two widgets would be added to the box layout later.
v_box = QtWidgets.QVBoxLayout()
It creates a vertical box layout - QVBoxLayout that the widgets added to this layout will be aligned vertically where firstly added widget is on top of other widgets.
It doesn’t do anything at the moment because it’s just a container where we’re going to put our widgets.
v_box.addWidget(buttonA)
v_box.addWidget(lableA)
It adds the button and label to the vertical box layout v_box.
If we run this code, we will get the push button and the label one underneath the other.
If you change the window size, you will see that these two widgets are not aligned any more.
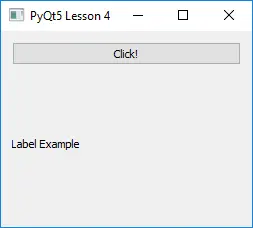
We will change our code to make it look better.
Horizontal Box - QHBoxLayout
import sys
from PyQt5 import QtWidgets


def basicWindow():
    app = QtWidgets.QApplication(sys.argv)
    windowExample = QtWidgets.QWidget()
    buttonA = QtWidgets.QPushButton("Push Me")
    labelA = QtWidgets.QLabel("Look at me")

    h_box = QtWidgets.QHBoxLayout()
    h_box.addStretch()
    h_box.addWidget(labelA)
    h_box.addStretch()

    v_box = QtWidgets.QVBoxLayout()
    v_box.addWidget(buttonA)
    v_box.addLayout(h_box)

    windowExample.setLayout(v_box)

    windowExample.setWindowTitle("PyQt5 Lesson 4")
    windowExample.show()

    sys.exit(app.exec_())


basicWindow()
Where,
h_box = QtWidgets.QHBoxLayout()
It creates a horizontal box layout.
h_box.addStretch()
h_box.addWidget(labelA)
h_box.addStretch()
The addStretch() widget fills up as much space horizontally as it can. Two stretches before and after the label take up as much space as need to leave the label right in the middle of the horizontal box.
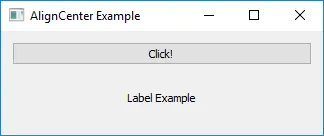
Horizontal Alignment Center
Another way to align the widget in the center is set the alignment of the widget to be AlignCenter.
import sys
from PyQt5 import QtWidgets
from PyQt5 import QtCore


def basicWindow():
    app = QtWidgets.QApplication(sys.argv)
    windowExample = QtWidgets.QWidget()
    buttonA = QtWidgets.QPushButton("Click!")
    labelA = QtWidgets.QLabel("Label Example")
    labelA.setAlignment(QtCore.Qt.AlignCenter)

    v_box = QtWidgets.QVBoxLayout()
    v_box.addWidget(buttonA)
    v_box.addWidget(labelA)

    windowExample.setLayout(v_box)

    windowExample.setWindowTitle("AlignCenter Example")
    windowExample.show()

    sys.exit(app.exec_())


basicWindow()
It only adds two lines compared to the first example above,
labelA.setAlignment(QtCore.Qt.AlignCenter)
The setAlignment method sets the alignment of the widget and QtCore.Qt.AlignCenter is the center alignment parameters from QtCore module that should be imported to the code.
It has exactly the same layout with the example above.

Founder of DelftStack.com. Jinku has worked in the robotics and automotive industries for over 8 years. He sharpened his coding skills when he needed to do the automatic testing, data collection from remote servers and report creation from the endurance test. He is from an electrical/electronics engineering background but has expanded his interest to embedded electronics, embedded programming and front-/back-end programming.
LinkedIn Facebook